Quantcast
Channel: Nextware Technologies Blog
Viewing all 76 articles
Browse latest View live

SCCM 2012 Tips And Info

$
0
0

CCM Tips And Info

  • Cache location – C:\Windows\ccmcache
  • Logs – C:\Windows\CCM\Logs
list of logs
  • Clear Cache manually
Control Panel > System and Security > Configuration Manager > Advanced Tab
  • Update machine policy manually
Control Panel > System and Security > Configuration Manager > Actions Tab
Run “Machine Policy Retrieval and Evaluation Cycle”
  • Config file
C:\Windows\SMSCFG.ini
Deleting this file and letting computer re-create it can sometimes resolve issues (must restart after deleting)
Last resort before uninstalling client?
  • Remove SCCM client
C:\Windows\ccmsetup\ccmsetup.exe /uninstall
  • Troubleshooting
Client content downloading troubleshooting guide (sorta helpful)

Silent Installs

http://unattended.sourceforge.net/installers.php

  • Agilent ADS: [ads installer].exe -f installer.properties
    • 2011.05 doesn’t install licensing tools, so have to install them separately. Told it should be fixed in next release in Dec.
    • Fixed with 2011.10 release
    • Agilent ICCAP can be installed same way as ADS (need different response file, obviously)
      • Seems like you can only run the newest ICCAP. Older versions can’t get a license.
  • Ansoft apps: setup.exe -s setup.iss
    • setup.exe -r to create response file.
    • Webupdate is currently broken, so have to manually apply updates. Updates require separate setup.iss files, but possible to re-use across multiple updates
  • BASIC Stamp – [installer].exe /s /v”/qb”
  • Cadence: setup.exe !quiet=silentinstall.ini
    • Need to set working directory to Disk1\ AND start command line as Disk1\setup.exe, otherwise will not find ini file
    • Cadence hotfix: [hotfixfile].exe -s setup.iss
      • Use [hotfixfile].exe -r to create setup.iss response file
  • CCS 3.3:
    • Modified setup.ini file to use /QB flag and TRANSFORMS flag (to put in C2400 files)
  • CCS 5: [ccs setup].exe /response-file [path to file]
    • /test (fake install, does not copy any files)
    • /save-response-file [path to file]
    • v5.2 – need firewall exception for C:\ti\ccsv5\eclipse\jre\bin\java.exe for silent install to work
  • COMSOL: setup.exe -s [setupfile].ini
    • Version 4.2: Must copy com.comsol.resources_1.0.0.jar (created during install of software) to /plugins directory of install media. Silent install fails without it. (Not necessary for v4.3)
  • CST Suite: msiexec /qb /i “CST Studio Suite 20xx.msi” ADDLOCAL=CST_STUDIO_SERIES_Files,Examples
    • Also need to run Catia VC9 installer in <CST media>\Bin\. x64 requires x64 Catia and x64 vcredist as well.
    • HKLM\Software\CST AG\CST DESIGN ENVIRONMENT\2012\ – LICENSESERVER = <licenseserver>
    • To autoupdate:  %programfiles%\Auto_Update_Control.exe updatefromdir:”<path to update file>”
  • Ghostscript: [gs installer].exe /S
  • IrfanView: [irfanview setup].exe /silent /folder=”%programfiles%\IrfanView” /group=1 /allusers=1 /ini=”%APPDATA%\IrfanView”
  • Mathematica: setup.exe /norestart /silent /suppressmsgboxes
    • Doesn’t overwrite older versions.
    • Copy mathpass file manually to C:\ProgramData\Mathematica\Licensing\
    • Not sure if “/norestart” is necessary.
  • Microsoft Office 2013:
  • MikTex: [basic miktex installer].exe –shared –unattended
  • Modelsim: (uses Mentor installer batch option. semi-terrible)
    • Creating a batch file
      • You should technically be able to just run the batch file by itself, but seems like it only works if you’ve hardcoded paths to the installer into the file. Since SCCM source paths can change, better to run the installer with the batch option.
    • install.exe -silent -batch [batchfile].bat < [answerfile].txt
      • the answer file is just a text file with ‘D’ on one line and ‘yes’ on the second
    • install.exe -silent -batchremove [batchfile].bat
  • MPLAB: msiexec.exe /qb /i [MPLAB Tools].msi
    • setup.exe doesn’t seem to do anything other than call the msi. And couldn’t get the usual silent methods to work, so just running the msi install.
  • MPLAB X: [MPLAB X installer].exe –mode unattended
    • Unattended is completely silent by default. Add –unattendedmodeui minimal for a progress bar.
    • Has its own uninstaller in the program files dir, use –mode unattended for a silent uninstall
  • OptiSystem: should be setup.exe /SILENT, but doesn’t work. They’ve disabled the automated install.
    • Copy in edited hasplm.ini file to %programfiles%\common files\aladdin shared\hasp\ before installing.
  • PLECS: [plecs blockset installer].exe /extract ./ to extract MSI file, then msiexec /qb /i [plecs blockset].msi ALLUSERS=1 INSTALLDIR=”%programfiles%\Plexim\Plecs Blockset <version> (<arch>)\”
    • Doesn’t seem to be possible to silently install exe to program files. Might work when run as SYSTEM?
  • PSCAD: can create response file for silent install, but always get prompt to input license server midway through
    • Also get prompts from Sentinel usbdriver install. Can avoid it by running the Sentinel installer beforehand though.
    • Gave up and re-packaged
  • Quartus II: altera_installer_cmd.exe –source=./[downloads files dir] –target=C:\altera\[version] –install=quartus –exclude_quartus_64bit
    • MUST extract files from altera_installer.external.exe in order to get access to altera_installer_cmd.exe (or launch external installer, then cancel it and grab files from your %TEMP% dir)
    • Alternate: Can edit .setup_args to contain –source, –target, etc and then simply launch setup.exe.
      • Still requires extracting files from the downloaded installer
      • Unsure if .setup_args can be called (UPDATE: Doesn’t seem so). If not, means would have to duplicate install files and have a modified .setup_args for x64
    • Installation directory CANNOT have spaces
    • Remove “–exclude_quartus_64bit” for 64bit installs
  • SIMetrix/SIMPLIS: [installer].exe /s for 32bit, [x64 installer].exe /s /b”%TEMP%” for 64bit
    • Use [installer].exe /r to create setup.iss response file. Need separate files for 32 and 64bit.
    • Wanted to use a MST with this installer like with TracePro, but doesn’t work for some reason. Brings up an error msg about “logging started”, then installer stops after you click OK. Running the msi with the mst works fine, but using the mst with the setup.exe doesn’t. No idea why.
      • Figured out why. Installer doesn’t know where to find MST because it’s not where the extracted MSI is. No good way to get around it. Tracepro installer is built better, I suppose?
  • Synopsys Saber: Saber_<version>_win.exe -f installer.properties
    • Installer can return either 0 or 1 for a success. 1 means succeeded but there was a warning. Silent installs seem to exit with 1 most of the time.
      • Patch installers seem to be the ones that flake out during silent installs. Main installer is fine.
    • silent install doesn’t seem to work for updates. runs but makes no changes.
  • Texmaker: texmakerwin32_install.exe /S
  • TracePro: [tracepro installer].exe /s /v”/qn”, for a completely silent install. use /qb for progress bar
    • If using a MST file, need to use /v”/qn TRANSFORMS=[filename].mst”
    • License info is per-user. Currently using a cmd script that is copied to Startup folder to copy in INI file to User’s Appdata folder to setup licensing. (UPDATE: switched to using GPOs)
    • 64bit install issue resolved. need /b”<path>” to specify where the installer should extract the MSI. So 64bit is [tracepro installer x64].exe /s /b”%TEMP%” /v”/qn TRANSFORMS=[filename].mst”
  • Winzip Self-extractors: [filename].exe /auto <directory>
  • Xilinx: bin\nt\batchxsetup.exe -batch ece.bat <eula.txt
    • Xilinx’s batch install is horrendous garbage.
      • “bin\nt\batchxsetup.exe” – necessary because you cannot cd to bin\nt and run it from there. It will fail because it cannot find the idata dir that’s in the root of the install files. Your working dir must be the root.
      • Use -samplebatchscript <batch_file_name> to create your batch file
      • <eula.txt – This gets you past the idiotic EULAs. eula.txt is nothing more than 5000 lines of ‘y’. It gets piped in by cmd.exe and advances and accepts the EULAs. (Yes, it really has to be an insane number of lines. Two few and it won’t get past the EULA.)
      • In order for all this to work, it has to be launched by cmd.exe. So if going through SCCM, use cmd.exe /c bin\nt\batchxsetup.exe
      • Finally, the installer tries to locate some image files near the end, but because of how it’s done it’s looking on C:\ instead of in the install files. Have to copy \idata\usenglish\idata\isebillboards\ to C:\ (full path and all)
    • Old method: Copy the installed files to another machine and run a batch file to add in shortcuts. I’ve used 7-zip to compress and archive the installed files (from 13GB to ~4)
    • 7z.exe x [Xilinx archive] -o%SYSTEMDRIVE%
    • Then run shortcutsSetup.bat in the bin folder (UPDATE: this batch file no longer seems to work)

Powershell

  • Operators
-eq (equals)
-ne (does not equal)
-like (can use wildcards with this)
  • Start-Process -File <path to file> -ArgumentList “<all arguments>” -wait
  • $LastExitCode – exit code of last run program
    • Doesn’t really work if you run the program using Start-Process. Never gets updated, so is either null or last previous value.
  • Sets $var to be the path where your script is being run from
$Invocation = (Get-Variable MyInvocation -Scope 0).Value
$var = Split-Path $Invocation.MyCommand.Path
  • Sets var to the version number of the running OS. Can use to check for XP or Vista/7 (hm, what about server…?)
    • XP is 5.1.xxxx, Vista is 6.0.xxxx, 7 is 6.1.xxxx, 8 is 6.2.xxxx
$var = (Get-WmiObject -Class win32_OperatingSystem).Version
if ($var -like “6.*”)
if ($var -like “5.1.*”)
  • creates “myY” of category “User”, and set the value to “”la la””
[Environment]::SetEnvironmentVariable(“myY”, “la la”, “User”)
  • example of adding a path to PATH
[System.Environment]::SetEnvironmentVariable(“PATH”, $Env:Path + “;C:\Program Files (x86)\PHP”, “Machine”)

VBScript

  • Notification Prompt – Waits for input

Set objArgs = WScript.Arguments
messageText = objArgs(0)
MsgBox messageText,64,”WolfTech Self-Service”

  • Timed notification prompt, quits after input or after 60 seconds

Set objShell = CreateObject(“Wscript.Shell”)
Set objArgs = WScript.Arguments

messageText = objArgs(0)
intReturn = objShell.Popup(messageText, 60, “WolfTech Self-Service”, 0 + 64)

Wscript.Quit 0

AutoIT bits

  • Setting SYSTEM env variable

$result = RegWrite(“HKEY_LOCAL_MACHINE\SYSTEM\CurrentControlSet\Control\Session Manager\Environment”, “SYSTEM_TEST_VAR”, “REG_SZ”, “Test”)
If $result = 1 Then

EnvUpdate()

EndIf

Other

  • Disabling file redirection in 64bit windows?

http://msdn.microsoft.com/en-us/library/aa365743(v=vs.85).aspx


Ref: http://www.wolftech.ncsu.edu/support/support/SCCM_tips_and_info


How To Delete The SCCM Client Cache Files

$
0
0

Sometimes you need to delete the SCCM Client cache if a software package you are trying to deploy gets corrupted. There are a couple of ways to delete the SCCM Client cache. Here’s how to delete the SCCM Client cache files using SCCM Client Center:

  1. Open SCCM Client Center
  2. Enter the SCCM Client computer name and connect to the client (top left hand corner of SCCM Client Center)
  3. Click Agent Actions
  4. Click the Cache tab
  5. Click the magnifying glass to find the cache path
  6. Click the magnifying glass to find the cache size
  7. Click Get List to list the files in the SCCM Client cache
  8. Right click each cache file and click Delete Pkg. from cache

Alternatively if you don’t want to use SCCM Client Center, you can simply navigate to the location of the SCCM Client cache (typically C:\WINDOWS\system32\CCM\Cache\) and manually delete the files… Do not delete all the files in the Cache directory, just the folders that contain the packages you think are corrupted and start with the SCCM site name ;)


Ref: http://www.public.madeinengland.co.nz/how-to-delete-the-sccm-client-cache-files/

SCCM 2012 – WCF is not activated when installing Application Catalog Web Service Point

$
0
0

I’ve seen a few customers come across the following issue when installing the Application Catalog Web Service Point role.


When trying to access the CMApplicationCatalog website, you’ll see the following:

====================================================================

Cannot connect to the application server.

The website cannot communicate with the server. This might be temporary problem. Try again later to see if the problem has been corrected.If the problem continues, contact your help desk.


You’ll see the following errors in system status:
====================================================================
Component: SMS_AWEBSVC_CONTROL_MANAGER
Message ID: 1016
Site Component Manager failed to install this component on this site system

Component: SMS_AWEBSVC_CONTROL_MANAGER
Message ID: 4971
Site Component Manager failed to install component SMS_AWEBSVC_CONTROL_MANAGER on server SiteServer.domain.com.    The WCF is not activated.  Solution: Make sure WCF is activated.
====================================================================

SMSAWEBSVCSetup.log will show:
====================================================================
WCF is not activated
Installation Failed. Error Code: 123
====================================================================

The error is due to a missing prerequisite.

They are documented here:
Supported Configurations for Configuration Manager
http://technet.microsoft.com/en-us/library/gg682077.aspx

On the above document, you’ll find that the Application Catalog web service point role requires the following:
http://technet.microsoft.com/en-us/library/gg682077.aspx#BKMK_Win2k12SiteSystemPrereqs

Features:

  • .NET Framework 3.5
    • HTTP Activation (and automatically selected options)
  • .NET Framework 4.5
    • ASP.NET 4.5

IIS Configuration:

  • Common HTTP Features:
    • Default Document
  • IIS 6 Management Compatibility:
    • IIS 6 Metabase Compatibility
  • Application Development:
    • ASP.NET 3.5 (and automatically selected options)
    • .NET Extensibility 3.5

*Note that there are slight differences for pre-2012 site servers as noted here.

Once you have the appropriate components installed in add roles and features, the role will install fine.

If you are installing the role on the same site server, you might need to reinstall the Application Catalog Website Point role after correcting your App Catalog Web Service Point.

Hope this helps!


Ref: http://blogs.technet.com/b/ryanan/archive/2013/08/01/wcf-is-not-activated-when-installing-application-catalog-web-service-point.aspx

Windows Server 2012 – Windows Deployment Services Deploying

$
0
0

Windows 8 Part 1: Install and Configure WDS

KB ID 0000735 Dtd 01/08/14

Problem

You want to deploy the Windows 8 Client Operating System, to a number of clients using WDS. In this part we will configure the WDS Server, then we will move onto taking an image of your reference Windows 8 machine. Finally we will cover taking that image, and deploying it out to many target systems.

Solution

Add the WDS Role

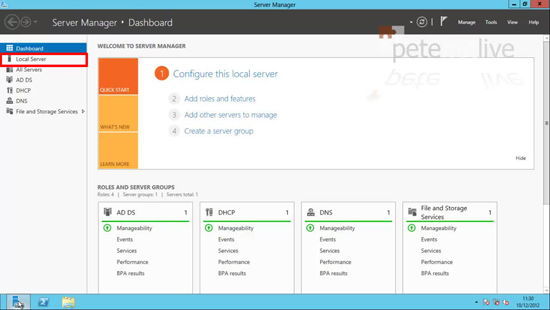
1. From Server Manager (ServerManager.exe) > Local Server.

ServerManager - Local Server

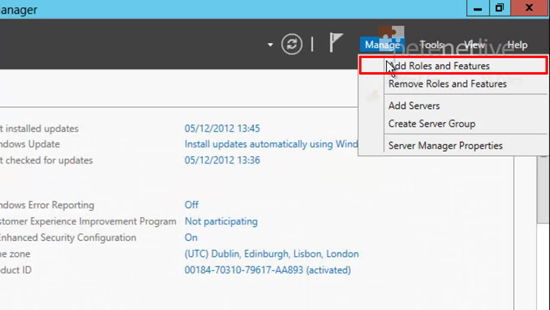
2. Manage > Add Roles and Features.

2012 Add Role

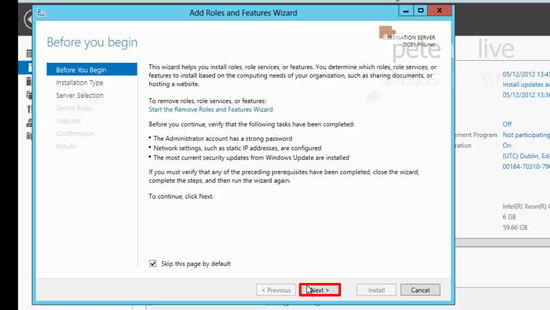
3. Next.

Add Roles to Server 2012

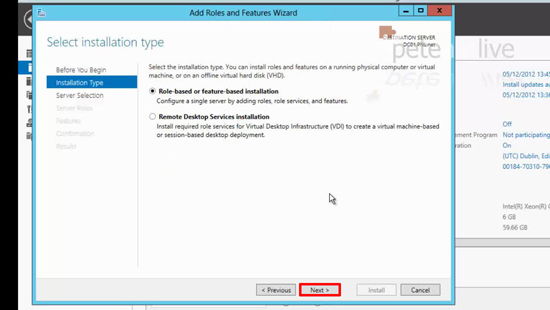
4. Next.

Add Roles and Features 2012

5. Next.

Local Role Windows Server 2012

6. Select ‘Windows Deployment services’ > Next > It will ask to install some other features let it do so.

Add Windows Deployment Services

7. Next.

WDS Feaures

8. Next.

Add Role Wizard

9. Accept the default (both roles) > Next.

WDS Deployment and Transport Roles

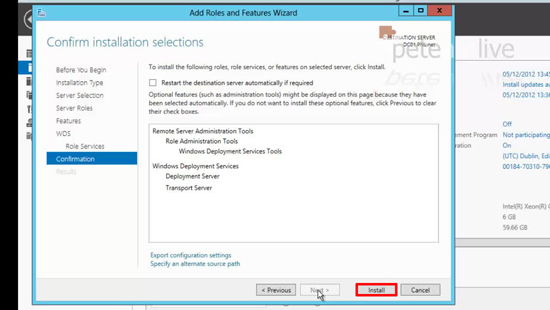
10. Install.

Confirm Installation

Configure the WDS Server

11. From the Start menu > Launch the Windows Deployment Services management console.

WDS Manager

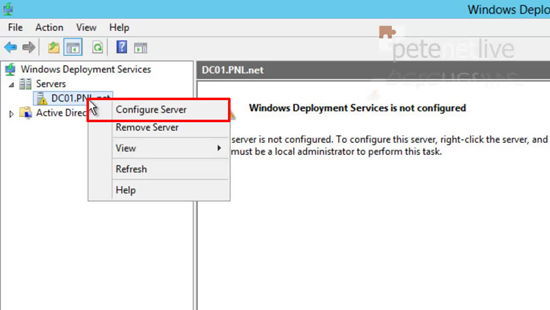
12. Expand servers > Right click the server name > Configure Server.

Configure WDS 2012

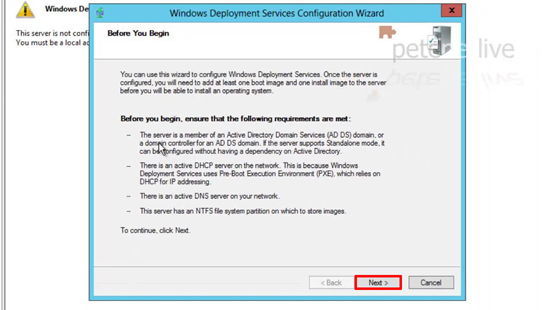
13. Read the prerequisites > Next.

WDS Prerequistes

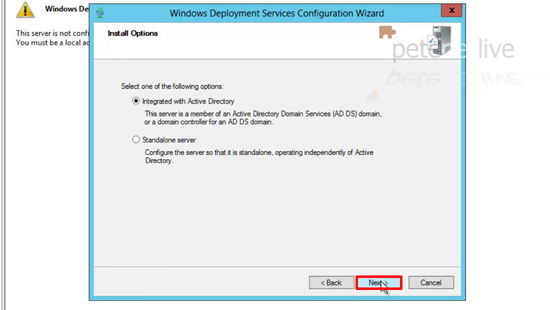
14. Next.

AD inegrated WDS

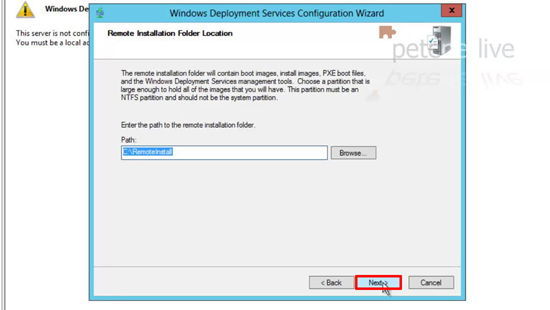
15. Select the location where you want to store your images and keep the WDS files.

WDS Image Location

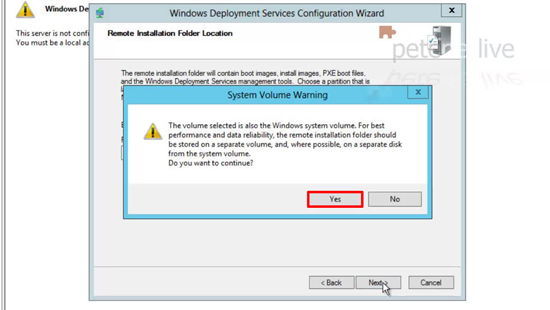
16. Note: In this case it’s warning me NOT to use the C:\ drive, as this is just a test server I will accept the warning and leave it as it is. In production environments make sure you are using a different drive/volume.

WDS Warning

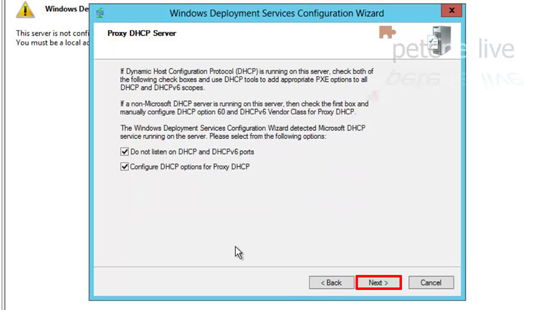
17. This particular server IS a DHCP server, but we will address the DHCP requirements when we are finished > Next.

WDS DHCP Options

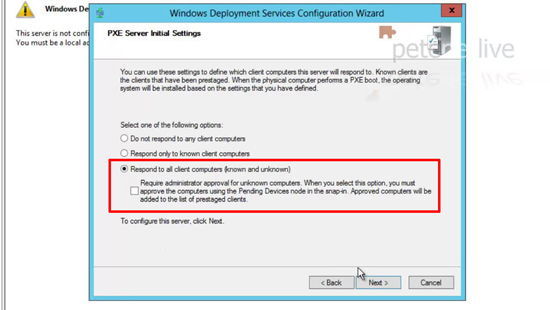
18. I’m going to choose ‘Respond to all (known and unknown)’ > Next.

WDS Respond to all

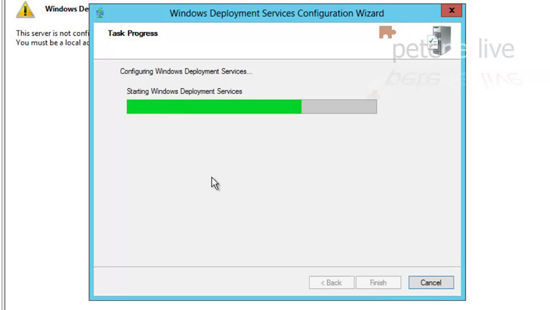
19. WDS should configure and the service SHOULD start.

WDS Install

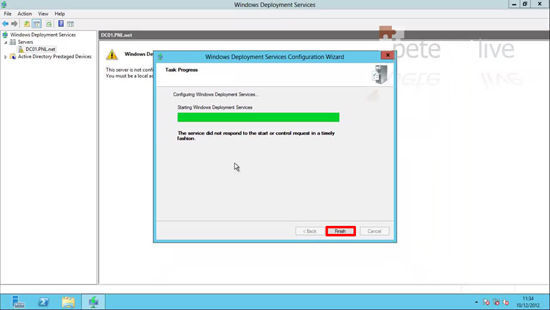
20. Here we can see the service has not started (the server will have a small stop symbol on it).

WDS Services not started

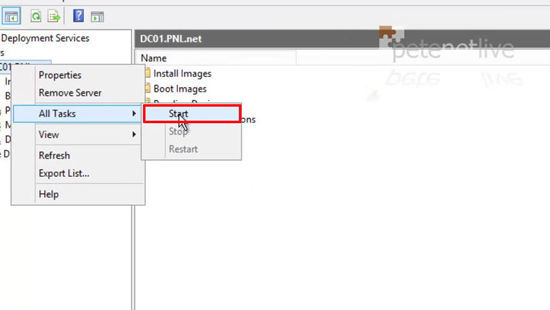
21. So I need to manually start the service.

Start WDS Services

Adding Image Groups and Images

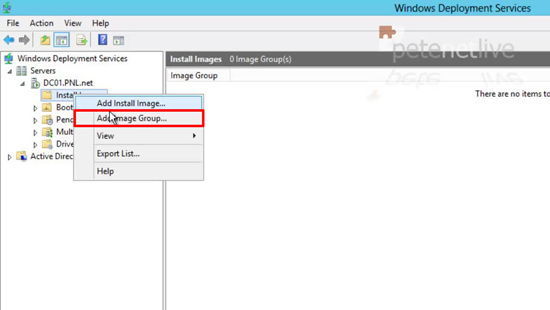
22. Firstly I’m going to create an group that will hold all my Windows 8 Client machine images. Right click Install Images > Add Image Group.

WDS Image Group

23. Give it a name > OK.

2012 Image Group Name

Adding a boot image (To send an image to a remote machine)

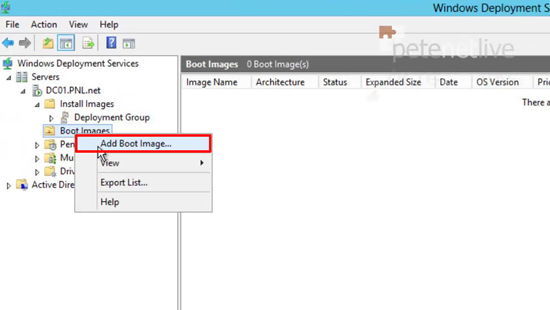
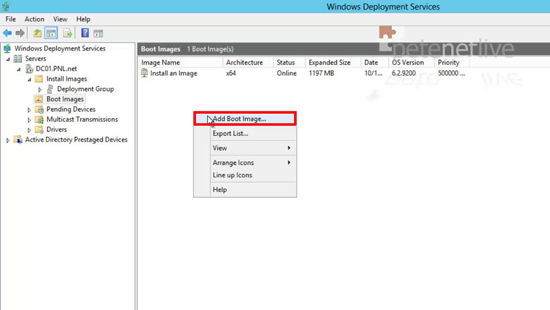
24. Now I need to add a boot image, so I can boot my remote clients from the WDS server and use this image to load WindowsPE on them, so they can be imaged. Right click Boot Images > Add Boot Image.

WDS Boot Image - Install Image

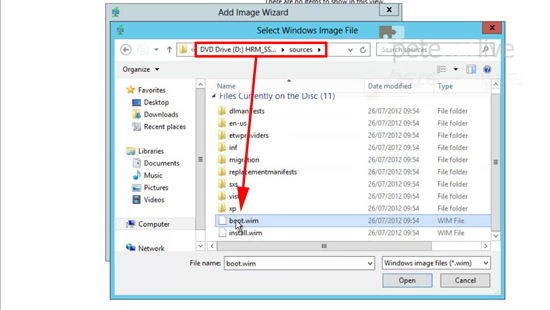
25. You can use either a Windows 8 DVD or a Windows Server 2012 DVD, you will need to navigate to the sources directory, and locate Boot.wim > Open.

2012 boot.wim

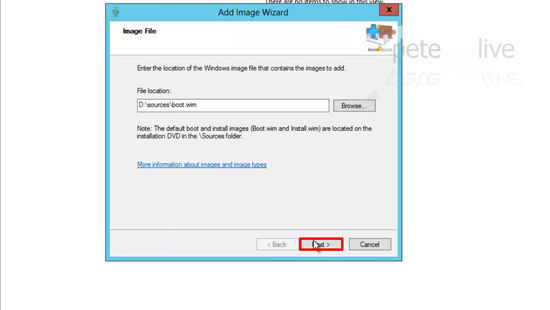
26. Next.

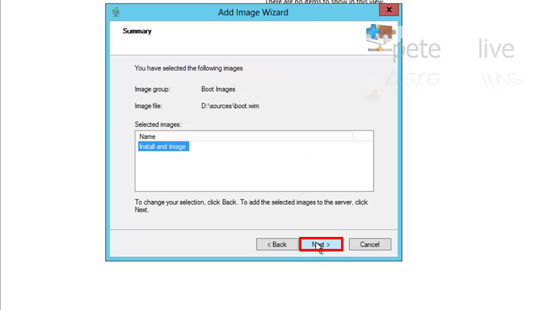
import image WDS

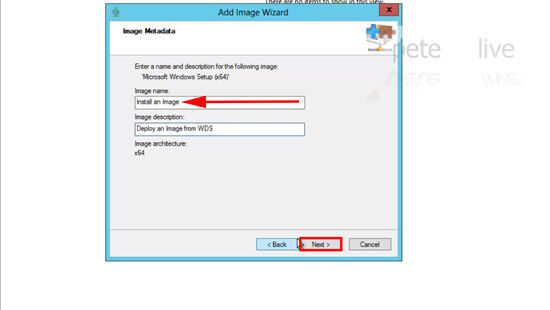
27. Rename the image ‘Install an Image’ > Enter a description > Next.

Install an Image WDS

28. Next.

Boot Image

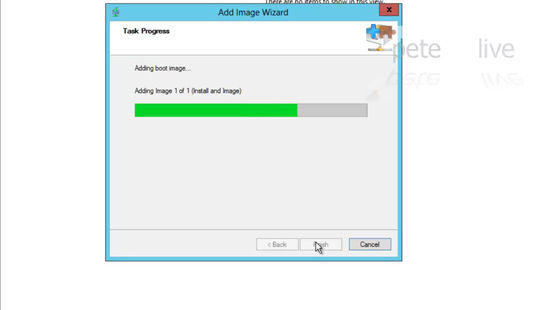
29. The Image will be imported.

Import Boot Image

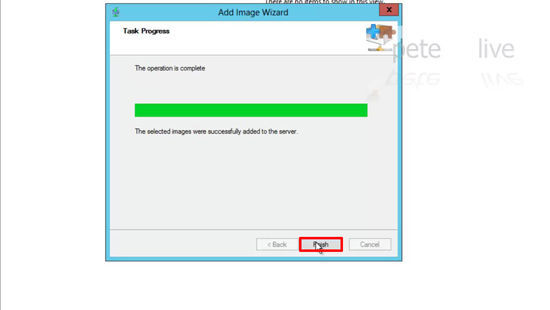
30. Finish.

Imported Windows Deployment Services Windows 8

Adding a Capture Image (To take an image from a remote machine)

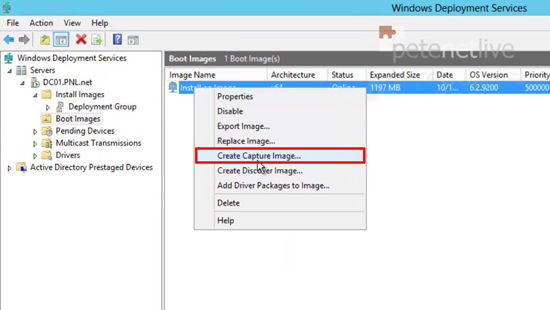
31. Right click the image we have just added > Create Capture Image.

Create Capture Image

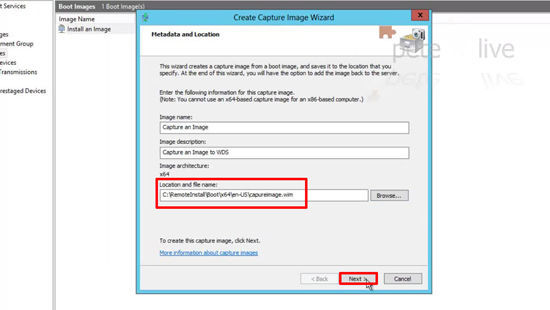
32. Call this one ‘Capture an Image’ > Give it a description > Save the image (with a .wim extension). Note: It does not matter where you save the image, but I would suggest somewhere in the ‘Remote Install’ folder > Next.

WDS Capture Image Location

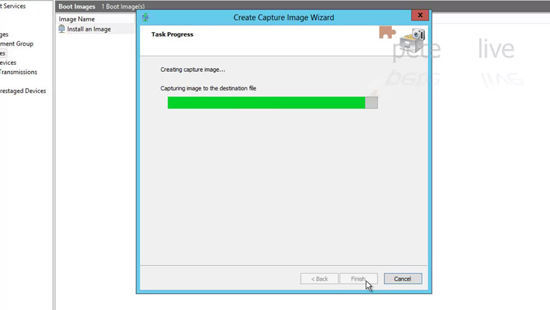
33. The image will be created.

Create Capture WDS

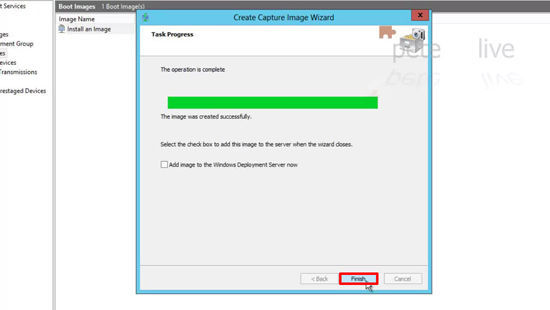
34. Finish

WDS Windows 8

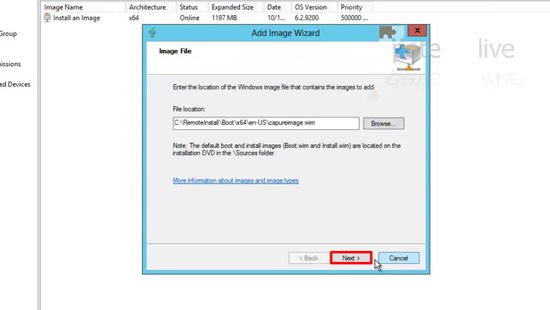
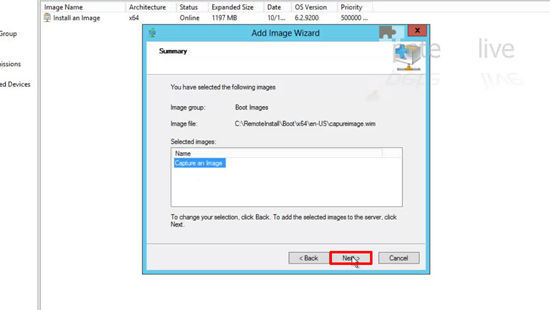
35. Now even through we have created the capture image, we still need to import it. Right click > Add Boot Image.

Boot Images Import

36. Select the capture image you created earlier > Next.

Import Capture

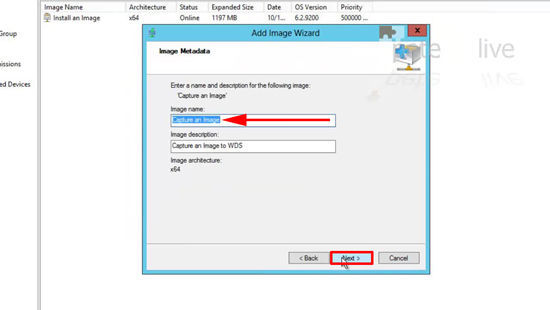
37. Make sure it’s called ‘Capture and Image’ > Next.

Image Capture Image

38. Next.

image add to wds

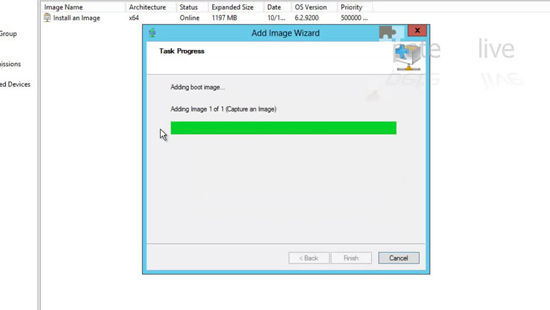
39. Now the capture image will be imported into WDS.

WDS Capture an Image

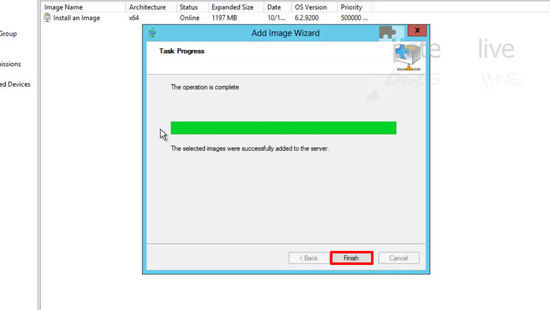
40. Finish.

Capture imported 2012

Configure DHCP with WDS Options

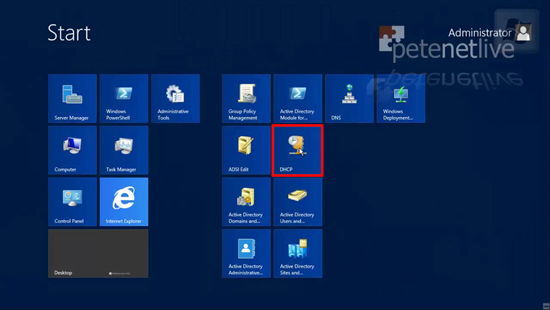
41. Launch the DHCP management console.

DHCP Manager WDS

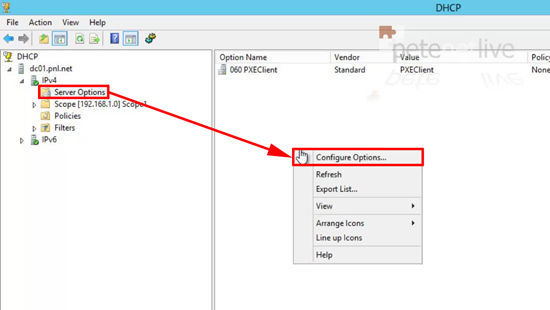
42. Open the active scope > IPv4 > Server Options > Configure Options.

Configure DHCP for WDS

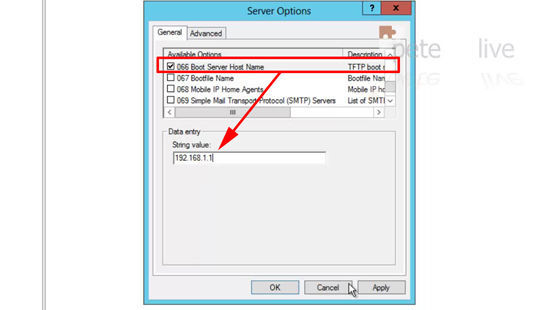
43. Tick Option 66 > Set its value to the IP address of the WDS server > Apply > OK.

DHCP Option 66

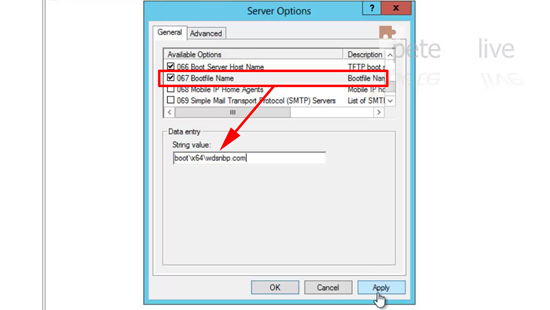
44. Tick Option 67 > Set its value to;

    boot\x64\wdsnbp.com

Apply OK

DHCP Option 67

45. Now you are ready to capture an image of your reference Windows 8 machine.

SCOM 2012 Documentation and Videos

$
0
0

ConfigMgr 2012 R2 – QuickStart Deployment Guide

$
0
0

ConfigMgr 2012 R2 – QuickStart Deployment Guide

This is to be used as a template only, for a customer to implement as their own pilot or POC, or customized deployment guide. It is intended to be general in nature and will require the customer to modify it to suit their specific data and processes.

This also happens to be a very typical scenario for small environments for a production deployment.  This is not an architecture guide or intended to be a design guide in any way. This is provided “AS IS” with no warranties, and confers no rights. Use is subject to the terms specified in the Terms of Use.


Server Names\Roles:

  • DB03               SQL Database Services, Reporting Services
  • CM1                Primary Site Server

Windows Server 2012 R2 will be installed as the base OS for all platforms.  All servers will be a member of the AD domain.

SQL 2012 with SP1 will be the base standard for all SQL database and reporting services.      http://technet.microsoft.com/en-us/library/gg682077.aspx


High Level Deployment Process:


1.  In AD, create the following accounts and groups, according to your naming convention:

  • DOMAIN\ConfigMgrAdmins            ConfigMgr Administrators security group
  • DOMAIN\ConfigMgrLocalAdmin     ConfigMgr Client Push account

2.  Add the domain user accounts for yourself and your team to the “ConfigMgrAdmins” group.

3.  Install Windows Server 2012 R2 to all server role servers.

4.  Install Prerequisites and SQL 2012 with SP1.

5.  Install the Site Server and Database Components

6.  Install the Reporting components.


Prerequisites:


1.  Install Windows Server 2012 R2 to all Servers

2.  Join all servers to domain.

3.  Install all available Windows Updates.

4.  Add the “ConfigMgrAdmins” domain global group to the Local Administrators group on each server.

5.  On CM1, Install required prerequisites for the site system roles (this covers all site system roles combined on a single server):

Open PowerShell (as an administrator) and run the following:

Add-WindowsFeature Web-Windows-Auth,Web-ISAPI-Ext,Web-Metabase,Web-WMI,BITS,RDC,NET-Framework-Features,Web-Asp-Net,Web-Asp-Net45,NET-HTTP-Activation,NET-Non-HTTP-Activ,Web-Static-Content,Web-Default-Doc,Web-Dir-Browsing,Web-Http-Errors,Web-Http-Redirect,Web-App-Dev,Web-Net-Ext,Web-Net-Ext45,Web-ISAPI-Filter,Web-Health,Web-Http-Logging,Web-Log-Libraries,Web-Request-Monitor,Web-HTTP-Tracing,Web-Security,Web-Filtering,Web-Performance,Web-Stat-Compression,Web-Mgmt-Console,Web-Scripting-Tools,Web-Mgmt-Compat -Restart

Note – if your machines are not internet connected, you might need to add a “–Source D:\sources\sxs” or whatever the path is to your Windows installation media.  By default Windows 2012 gets .NET 3.5 from Windows Update, but this doesn’t always work, and will never work for machines without an internet connection.

After installing these roles/features, you might have to register ASP.NET with IIS.  The simplest way is to open an elevated command prompt: C:\Windows\Microsoft.NET\Framework64\v4.0.30319>aspnet_regiis.exe –r

6.  On CM1 – Install the Deployment Tools, Windows PE, and the User State Migration tool from the Windows 8.1 ADK:   http://www.microsoft.com/en-us/download/details.aspx?id=39982

7.  On CM1 – add the WSUS feature from Server Manager.

8. Install SQL 2012 with SP1 to the DB server role

  • Setup is fairly straightforward. This document will not go into details and best practices for SQL configuration. Consult your DBA team to ensure your SQL deployment is configured for best practices according to your corporate standards.
  • Run setup, choose Installation > New Installation…
  • When prompted for feature selection, install ALL of the following:
    • Database Engine Services
    • Full-Text and Semantic Extractions for Search (required for OpsMgr is doing a shared SQL deployment)
    • Reporting Services – Native
  • Optionally – consider adding the following to ease administration:
    • Management Tools – Basic and Complete (for running queries and configuring SQL services)
  • On the Instance configuration, choose a default instance, or a named instance. Default instances are fine for testing and labs. Production clustered instances of SQL will generally be a named instance. For the purposes of the POC, choose default instance to keep things simple.
  • On the Server configuration screen, set SQL Server Agent to Automatic.  You can accept the defaults for the service accounts, but I recommend using a Domain account for the service account.  Input the DOMAIN\sqlsvc account and password for Agent, Engine, and Reporting.
  • On the Collation Tab – you can use the default which is SQL_Latin1_General_CP1_CI_AS or choose another supported collation.
  • On the Account provisioning tab – add your personal domain user account or a group you already have set up for SQL admins. Alternatively, you can use the ConfigMgrAdmins global group here. This will grant more rights than is required to all ConfigMgrAdmin accounts, but is fine for testing purposes of the POC.
  • On the Data Directories tab – set your drive letters correctly for your SQL databases, logs, TempDB, and backup.
  • On the Reporting Services Configuration – choose to Install and Configure. This will install and configure SRS to be active on this server, and use the default DBengine present to house the reporting server databases. This is the simplest configuration. If you install Reporting Services on a stand-alone (no DBEngine) server, you will need to configure this manually.
  • Setup will complete.
  • You will need to disable Windows Firewall on the SQL server, or make the necessary modifications to the firewall to allow all SQL traffic.  Seehttp://msdn.microsoft.com/en-us/library/ms175043.aspx

9.  On the SQL server – add the Computer Account in the domain to the local administrators group of the SQL database server (DOMAIN\CM1$)

10.  In Active Directory – extend the schema, create the System Management container, and assign permissions:  http://technet.microsoft.com/en-us/library/gg712264.aspx#BKMK_PrepAD

Step by step deployment guide:


1.  Install the Primary Site Server role on CM1.

  • Log on using your personal domain user account that is a member of the ConfigMgrAdmins group.
  • Run Splash.hta
  • Click Install
  • Read the “Before You Begin” Info and click Next.
  • On the Available Setup Options, choose to install a primary site, but to NOT check the box for typical options.  We are going to configure each step for our site and use a remote SQL database server.
  • Choose Eval or input your license key and click Next.
  • Accept the Eula and click Next.
  • Accept the additional license agreements and click Next.
  • Provide a path to the prereq file downloads.  If you have not downloaded these recently then create a new folder for these, locally or on a remote path.
  • Choose your language(s) and click Next, on the server and client screens.
  • Input a site code for your primary site.  Input a description.  Choose a path.  Make sure you are also installing the console.  Click Next.
  • Choose to install a primary site as a stand alone site.  We can add a CAS later in ConfigMgr 2012 SP1 and later.
  • Input the SQL server name, instance, click Next.
  • Accept the default for the SMS provider.  Next.
  • Choose to configure the communication method on each site system role, and to not use HTTPS (don’t check box.)  Next.
  • Choose HTTP for the MP and DP – we can change this to HTTPS with certs down the road.  Next.
  • Choose to enable CEIP or not.  Next.
  • Choose next to run prereq checker.  Resolve any issues.  Click Begin Install.
  • Install Completes.  Click Close.

Post Deployment Configuration:

1.  Add Site System Roles:

2.  Enable discoveries

image

This will bring in the AD site and IP boundaries.

  • Enable AD Group discovery to bring in Security groups and group membership for computers.  Create a scope that makes sense only for groups you need to discover.
  • Enable AD system discoveries to bring in systems.
  • Enable User discovery

3.   Configure Boundaries and Boundary Groups

  • Create a boundary group and add your site boundaries and site servers to it, for site assignment.

4.  Configure Client Device Settings

  • Administration > Client Settings > Create Custom Client Device Settings
  • Check:
    • Client Policy
    • Computer Agent
    • Software Updates
  • Configure Client policy polling as appropriate (longer for production, faster for labs)
  • Configure “Set Website” for Application Catalog on Computer Agent settings and customize any additional settings.
  • Set a schedule for software update scans for 1 day.
  • Deploy your new client device systems to All Systems (for a lab)

5.  Install Clients:   http://technet.microsoft.com/en-us/library/gg712298.aspx

  • Assign a client Push account to Administration > Site Configuration > Sites > Client Installation Settings
  • Install clients to a collection

6.  Verify Hardware and software inventory for clients

7.  Enable Endpoint protection

  • Client Settings – create a new client device setting.  Enable endpoint protection.
  • Configure Client device settings to turn on Endpoint protection and deploy endpoints.
  • Deploy new client policy to All Desktop and Server Clients Collection, or a custom collection
  • Create automatic deployment rule for definition updates using Definition template.

Continue on with additional steps from TechNet, such as software deployment, software updates, OSD, etc.


Ref: http://blogs.technet.com/b/kevinholman/archive/2013/10/30/configmgr-2012-r2-quickstart-deployment-guide.aspx

Step by Step configuring and troubleshooting SCCM 2012 R2 OSD deployment

$
0
0

The “Step by Step” guides on my blog are getting more and more searched and hit now, which inspired me to helping more people.

We’ve already built our SCCM 2012 environment

Created the computer collection

configured the software update for automatically deploy the security patch

cooperate with SCVMM for the patch management

integrated with MDT

So guess what’s next?

Today I’d like to talk about the OSD deployment in SCCM 2012 R2

Let’s get started

1. DHCP

PXE boot require the network adapter to get a local IP address from the DHCP server, so a working DHCP environment is required

In addition, if your DHCP server and WDS server are the same server, there’s some extra steps you need to enable DHCP option 60

If you need PXE broadcast to a different VLAN, you will need to allow the IP Helpers traffic on the router

You can find more details for the above two scenarios here

image

2. Create PXE boundaries

SCCM Console->Administration->Overview->Hierarchy Configuration->Boundaries

SCCM Console->Administration->Overview->Hierarchy Configuration->Boundary Groups

Since my lab default boundary is the Active Directory site, which means all of the computer in local domain is included. However, a new bare metal machine needed to be deployed is not a domain joint machine, so we have to manually create a boundary based on PXE boot IP address range from my DHCP server.

If you already have a IP address boundary included the PXE boot device, you can ignore this step

image

As you can see from above, I’ve created a new IP address range boundary (based on my DHCP IP address range) for my PXE boot computers, and add it into my boundary groups as well

3. Enable PXE support

SCCM console->Administration->Distribution Points

clip_image002

Enable PXE support for clients

Allow this distribution point to respond to incoming PXE requests

Enable unknown computer support (optional)

If you selected Enable unknown computer support, any unknown computer, like a new bare metal computer, can PXE boot and deploy the OSD image, which may has potential security rick

If you disable this option, you can using “Import Computer Information” to pre-stage your computer for the OSD deployment.

SCCM console->Assets and Compliance->Devices->Import Computer Information

clip_image005

4. WDS (Windows Deployment Service)

WDS server role is required for OSD, unlike SCCM 2007, start from SCCM 2012, Microsoft add the ability to install WDS server role for the Distribution Point server automatically, It is always recommended to let SCCM to install the WDS for you since I saw some people has problem when they manually installed the WDS role.

Once it’s installed, let’s check the option in WDS

clip_image001

Make sure “Respond to all client computers (known and unknown)” is selected. I had this issue when I enable the PXE boot, SCCM installed the WDS but leave here to “Do not respond to any client computer”

clip_image002

That’s all we need to do with WDS, and we can just let SCCM to handle it from now on.

5. Network Access Account

SCCM Console->Administration->Site Configuration->Site->Your Site->Configure Site Components->Software Distribution

The Network Access Account is the account used to access your shared folders and files on DP server which is a domain joint server, so we have to create a dedicated domain account with read privilege to access those shared folder

clip_image003[5]

6. Add Drivers (optional)

SCCM Console->Software Library->Operating Systems->Drivers

You can import drivers which can be injected into your boot image or system image later

7. Add Driver Package (optional)

A driver package is where all of the drivers files located

8. Add Operating System Images

This is the place where you can add the Operating System Image files (.wim) need to be deployed

Extract your Windows installation .iso file and located the install.wim (under sources\install.wim)

clip_image002[10]

Distribute the OS image

clip_image001[5]clip_image002[5]

9. Add Operating System Installers

This is the place where all of your OS files you extract to

clip_image002[12]

Distribute the OS installer

clip_image003[7]

10. Boot Images

The default boot images came from SCCM can work well, but we still need to enable the command support for troubleshooting purpose, which means we can hit F8 key to call up the command line and using CMtrace.exe (Trace32.exe in SCCM2007) to read the logs during the deployment.

clip_image001[7]

Enable “Deploy this boot image from the PXE-enabled distribution point” as well

clip_image002[7]

Don’t forget to distribute the boot images out

clip_image003[9]

11. Configuration Manager client upgrade package

The default Configuration Manager client package is fine for a lab environment, but it’s not that flexible for hierarchy environment.

image

As you can see above, most of the settings are greyed out, which means you cannot “Copy the content in this package to a package share on distribution points”

So we have to create a configurable client package:

SCCM console->Software Library->Application Management->Packages->Create from Definition

imageimage

Select “Configuration Manager Client Upgrade” and then choose “Always obtain source files from a source folder”, locate the SCCM client folder

imageimage

12. Create Task Sequences

So up until this point, everything is ready to create our first task sequence.

Some people always confused about why we have to create a “Build and Capture” task sequence first, and then build create the real OS deployment task sequence

This is because the “Build and Capture” will build a bare metal machine as a golden computer, you can make any changes you want on this OS and re-capture it to your SOE image, then update the OS deployment task sequence, deploy it out.

Build and Capture (optional)

SCCM Console->Software Library->Operating Systems->Task Sequences->Create Task Sequence

clip_image002[14]

Name it and select a boot image

clip_image004[5]

I’m going to build and capture a Windows 8.1 reference computer

clip_image006

Do not join your reference computer to the domain since it’s your SOE

clip_image008

Install the SCCM client package we created earlier:Microsoft Configuration Manager Client Upgrade 6.0 ALL

Configure the MP (Management Point) server FQDN: SMSMP=SCCM.lab.RickyGao.com

image

Include Updates:

Do not install any software updates since we can inject the patches later in task sequence

Install Application:

Do not install any software updates since we can inject the application later in task sequence

Capture Image:

Specify the image path for your capture image

clip_image012

Distribute the task sequence out

Deploy the task sequence to a specific computer collection

Since I don’t have a computer account pre-stage in SCCM as I mentioned before, my bare metal computer will be in “All Unknown Computers” collection

clip_image014

clip_image016

Available and Required

Available means user either need to press F12 button during boot or run the task sequence from the software center

Required means when the computer boot up from the PXE, it start running the task sequence straight away.

Make available to the following

Only Configuration Manger Client: only available in software center

Configuration Manger clients, media and PXE: available in software center, boot media or PXE boot

Only media and PXE: available in boot media and PXE boot

Only media and PXE (hidden): available in boot media and PXE boot but hidden

13. PXE boot VM in Hyper-V

Only “Legacy Network Adapter” is supported in generation 1 VM

clip_image018

As you can see above, I got 2 NIC but only Legacy NIC is available for boot

If you have Windows Server 2012 R2 Hyper-v, you can use generation 2 VM which support PXE boot from the new NIC adapter with the support gigabyte NIC

image

Boot your computer

Hit F12

clip_image020image

It’s loading my Boot image (x64) now

clip_image024

You can protect access the task sequence by password, just go back to step 2, PXE setting, and set the password there

clip_image025

Select the task sequence you want to deploy

clip_image026clip_image027

Once it’s finished, you will see your captured image in your specified location

Import the captured image and distribute it out

image

14. Deploy your operating system images

Finally it’s time we can deploy the OS images.

The reason why I mentioned the “Build and Capture” process above is optional is that if we don’t want customize the operating system in that reference machine, just want to deploy a new OS via PXE like we install OS using the installation disc, we can just skip the “Build and Capture” stage, deploy the original Windows image straight away

Create a new task sequence->Install and existing image package

clip_image029

Here we can select either use the image we just captured, or just select the image from the original installation disk.

If you selected the image we just captured, then we will deploy our target machine based on our reference computer

If you selected the original install.wim from the installation disc, we will just deploy the target machine like factory default

I’m going to deploy an original image from the installation disc this time

imageimage

15. Troubleshooting

When we are doing the troubleshooting in OSD, the most useful tool we are using is to use CMTrace.exe (Trace32.exe) to check the log file smsts.log in different locations

WindowsPE, before HDD format:              x:\windows\temp\smstslog\smsts.log

WindowsPE, after HDD format:                 x:\smstslog\smsts.log

Windows, SCCM agent not installed:       c:\_SMSTaskSequence\Logs\Smstslog\smsts.log

Windows, SCCM agent installed:               c:\windows\system32\ccm\logs\Smstslog\smsts.log

Windows x64, SCCM agent installed:       c:\windows\sysWOW64\ccm\logs\Smstslog\smsts.log

Task Sequence completed:                           c:\windows\system32\ccm\logs\smsts.log

Task Sequence completed x64:                   c:\windows\sysWOW64\ccm\logs\smsts.log

Unfortunately, we have to memorize all of the locations if you want to boost your efficiency

1). distmgr.log

Records details about package creation, compression, delta replication, and information updates.

When you distribute content, this log is really useful

2). SMSPXE.log

Records details about the responses to PXE boot clients and details about expansion of boot images and boot files

3). The specified UNC path does not contain a valid WIM file or you do not have permission to access it. Specify a valid path

This is because SCCM doesn’t accept administrative share when you importing the OS image

clip_image032_thumb[3]_thumb

4). WINPE load failed and keep rebooting after it loaded up

This is probably because of low memory has been allocated if you are using VM, 512MB may cause this issue, usually at least 1GB, better 2GB for a VM

When you are using the dynamic memory, low startup memory may trigger this issue as well.


5). 0x800705AF error during the first time PXE boot

Failed to create shared environment)

Failed to create the Shared Environment object. Code(0x800705AF)

image_thumb[11]_thumb


This is still because insufficient memory


16. Advanced MDT boot image (optional)

17. Advanced MDT task sequence (optional)

I will have a separate post regarding to 16 and 17


Ref: http://www.rickygao.com/step-by-step-configuring-and-troubleshooting-sccm-2012-r2-osd-deployment/

System Center 2012 Service Accounts & Permissions

$
0
0

System Center 2012 Service Accounts & Permissions

In this post I thought I would provide some information around the requirements for some of the accounts System Center 2012 requires when installing and some of the immediate accounts for the base configuration.

I think that all this information is already out there, but this post helps to pull it all into one central location and hopefully easier to digest.

All this information is of course assuming that you:

  1. Have already drawn up a design for your System Center 2012 Infrastructure with considerations to components, layout, performance sizing etc…
  2. You already have all your base VM’s and SQL installs done.
  3. All Pre-reqs are installed.
  4. You know how to install the System Center 2012 Components.

If you need more information on points 3 & 4 then a further post is coming listing lots of install guides and powershell scripts to install the pre-requisites.

Couple of tips first though:

Tip # 1 – Ensure the account used during install has rights to create databases on the SQL instance(s)/server(s) you specify during installation and can add security rights etc. Easiest option is to give the account SQL SysAdmin privileges and then look to revoke later.

Tip #2 – While using the Local System or Network Service option for the accounts is the easiest, I would personally only recommend this for lab/test environments.

Tip #3 – Again, using the same account over and over is easiest, but from a security and also risk mitigation perspective, separate accounts is what I recommend.  For example, using one account for all services possibly across multiple products would mean more than one system would fail if this account became locked out.

Tip #4 – If using (and it’s recommended) domain accounts for the SQL services, don’t forget to ensure the SPN’s are registered for them.

Tip #5 – Staying on SPN’s, ensure the data access service accounts get their SPN’s registered

Tip #6 – Rule of least privileges.  It’s always tempting just to drop the accounts into either the local admins group, sysadmin or heaven forbid the domain admins group.  Hopefully this information will help with only assigning the accounts the least amount of privileges they require which will always be best practise.

Below are a series of tables with example account names, their purpose and the permissions they require.
I’ve used the domain of TrustLab in this example so all accounts are in the format of <DomainName>\<AccountName>
Like I say, these are examples only, use your own naming conventions for service accounts.

Virtual Machine Manager Accounts
http://technet.microsoft.com/en-us/library/gg697600.aspx

Account Examples Purpose Permissions
TrustLab\SCVMMSA SCVMM Service Account Local Admin rights on VMM Server
TrustLab\SCVMMHVHost Adding Hyper-V hosts to VMM Local Admin rights on target Hyper-V server.
TrustLab\SCVMMOMCon SCVMM to SCOM connector account SCOM Administrator Role
SCVMM Administrator Role
TrustLab\DomJoin Domain Joining Account used in templates for VM Deployment Do not grant the account interactive logon rights.
Use Delegate Control in AD:
Computer Objects -
Reset Password
Validated write to DNS host name
Validated write to service principal name
Read/Write Account Restrictions

This object and all descendant objects -
Create/Delete Computer Objects

Configuration Manager Accounts
http://technet.microsoft.com/en-us/library/hh427337

Account Examples Purpose Permissions
TrustLab\SCCMNA SCCM Network Access Account Requires “Access this computer from the network” right on the Distribution Points.
Minimum rights to access content on the Distribution Points.
TrustLab\DomJoin Domain Joining Account used within task sequences to join the OS to the domain. Do not grant the account interactive logon rights.
Use Delegate Control in AD:
Computer Objects -
Reset Password
Validated write to DNS host name
Validated write to service principal name
Read/Write Account Restrictions

This object and all descendant objects -
Create/Delete Computer Objects

TrustLab\SCCMCP SCCM Client Push Account Do not grant the account interactive logon rights.
Must be local admin on the target devices you push clients to.
TrustLab\SCCMRA SCCM Reporting Service Point Account Account is granted rights if chosen as a new account during Reporting Point creation from the console.

N.B. There are FAR too many accounts to realistically list for ConfigMgr, please refer to the link above for a full breakdown.  Listed are the most common ones needed for the base install.

Operations Manager Service Accounts
http://technet.microsoft.com/en-us/library/hh298609.aspx

Account Examples Purpose Permissions
TrustLab\SCOMAA SCOM Action Account Local Admin (NOT Domain Admin)
TrustLab\SCOMDA SCOM Data Access Account Local Admin
TrustLab\SCOMDR SCOM Data Warehouse Read Account Setup assigns Read to DW DB.
Best Practice to ensure account has SQL Logon rights before installation
TrustLab\SCOMDW SCOM Data Warehouse Write Account Setup assigns Read to Operational DB, Write to DW DB.
Best Practice to ensure account has SQL Logon rights before installation

N.B. Always use the same Action Account & Data Access Account for each Management Server you deploy.
N.B. This list does not cover RunAs accounts for management packs such as the SQL or AD MP’s.  Please refer to the applicable guide for the management pack for details/requirements.

Service Manager Service Accounts
http://technet.microsoft.com/en-US/library/hh495662.aspx

Account Examples Purpose Permissions
TrustLab\SCSM Admins
(This is a group not an account)
Management group administrators Account used to run setup must be able to add users to this group as it will try to auto add the user to it.
TrustLab\SCSMSA SCSM Service Account Local Admin on SCSM Server(s)
Must be same account for DW & MS Servers.
TrustLab\SCSMRA SCSM Reporting Account Nothing specific, will be granted rights in SQL during install.
TrustLab\SCSMAS SCSM Analysis Services Account Nothing specific, will be granted rights in SQL during install.
TrustLab\SCSMWF SCSM Workflow Account Normal User permissions, but must have mailbox and send permissions for notifications.
Manually add account to Service Manager Administrators after install if not present.

N.B. I haven’t listed the accounts here that are used for setting up SharePoint which will be needed when installing SharePoint dedicated for the Self Service Portal as I am not a SharePoint expert and would recommend seeking dedicated SharePoint best practise advice for that.

Service Manager Connector Accounts

Account Examples Purpose Permissions
TrustLab\ SCSMADCON Active Directory Connector Account AD Read
Advanced Operator in Service Manager
TrustLab\SCSMOMCICON SCOM CI Connector Account Operations Manager – Operator Privileges
Service Manager -Advanced Operator
TrustLab\SCSMOMALCON SCOM Alert Connector Account Operations Manager – Administrator
Service Manager -Advanced Operator
TrustLab\SCSMCMCON SCCM Connector Account SCCM SQL DB -smsdbrole_extract & db_datareader roles
Service Manager -Advanced Operator
TrustLab\SCSMSCOCON SCORCH Connector Account Read Properties, List Contents and Publish permissions to the root Runbook folder and all child objects. Grant via the Runbook Designer.
TrustLab\SCSMVMMCON SCVMM Connector Account SCVMM Administrator
Local Admin on VMM Server
Service Manager -Advanced Operator

Orchestrator Service Accounts
http://technet.microsoft.com/en-us/library/hh912319.aspx

Account Examples Purpose Permission
TrustLab\SCORCHSA Orchestrator Management Service Recommended to be a domain account. No special permissions required other those that the installer assigns during installation.
TrustLab\SCORCHSA Orchestrator Runbook Service Recommended to be a domain account so that if Runbooks require access to remote resources, rights can be granted to this account.
TrustLab\SCORCHSA Orchestrator Runbook Server Monitor service Same account used as Orchestrator Management Service and same rights required.

N.B. As is common with most deployments of Orchestrator, if you install the Management Server and Runbook Server components at the same time on the same server they will both use the same service account.
N.B. To deploy an IP to Runbook Designer, ensure the account running the Deployment Manager has local admin rights on the target otherwise you will get Access Denied.

Ref: http://www.systemcenter.ninja/2012/05/system-cennter-2012-service-accounts.html

Migrating from Windows XP to Windows 8.1 using MDT 2013

$
0
0

Most people using MDT at this point have made the migration to Windows 7 and are looking at MDT 2013 to help with getting to Windows 8.1.  But there are a number of stragglers who are looking to go directly from Windows XP to Windows 8.1 (and hopefully finishing that by April 2014 when Windows XP support expires).

The challenge with this scenario is that some of the tools released as part of the ADK for Windows 8.1 don’t support Windows XP.  That includes the User State Migration Tool (version 6.3) and BOOTSECT.EXE, one of the core deployment tools used to put a new boot sector onto an existing Windows XP device so that it can boot a modern OS.

Fortunately, there are workarounds for these two challenges.  In the case of USMT, you can use the previous version from the ADK for Windows 8 to capture the user state and the new version from the ADK for Windows 8.1 to restore it.  And for BOOTSECT.EXE, you can just use the older version from the ADK for Windows 8 as it still runs on Windows XP.

So the real question then is “how do you get MDT to use these older versions,” since it only supports the ADK for Windows 8.1 and the tools included in it.  That requires a little work.  Let’s review the steps.

  1. Replace ZTIUserState.wsf in your MDT 2013 deployment share “Scripts” folder with the one from the attached zip file.  (Don’t try to put this script in any other version of MDT, older or newer.  It’s only designed for MDT 2013.  Feel free to compare the file with the original version to see the changes that I made.)
  2. Install the ADK for Windows 8 on a Windows 7 or Windows 8 system.  You only need to select two components, Deployment Tools and User State Migration tool (which will make the download much faster):
    image
  3. Copy the USMT files from the system with the ADK for Windows 8 to the deployment share:
    XCOPY “C:\Program Files (x86)\Windows Kits\8.0\Assessment and Deployment Kit\User State Migration Tool\x86″ “\\SERVER\DeploymentShare$\Tools\x86\USMTX”
    XCOPY “C:\Program Files (x86)\Windows Kits\8.0\Assessment and Deployment Kit\User State Migration Tool\amd64″ “\\SERVER\DeploymentShare$\Tools\x64\USMTX”
  4. Make a backup copy of the existing BOOTSECT.EXE executables from the ADK for Windows 8.1 installation folders (C:\Program Files (x86)\Windows Kits\8.1\Assessment and Deployment Kit\Deployment Tools\<platform>\BCDBOOT\bootsect.exe).
  5. Copy the BOOTSECT.EXE executables from the ADK for Windows 8 to the computer running MDT 2013, replacing the version from the ADK for Windows 8.1:
    COPY “C:\Program Files (x86)\Windows Kits\8.0\Assessment and Deployment Kit\Deployment Tools\x86\BCDBoot\bootsect.exe” “\\Server\C$\Program Files (x86)\Windows Kits\8.1\Assessment and Deployment Kit\Deployment Tools\x86\BCDBoot\bootsect.exe”
    COPY “C:\Program Files (x86)\Windows Kits\8.0\Assessment and Deployment Kit\Deployment Tools\amd64\BCDBoot\bootsect.exe” “\\Server\C$\Program Files (x86)\Windows Kits\8.1\Assessment and Deployment Kit\Deployment Tools\amd64\BCDBoot\bootsect.exe”
  6. Update the deployment share (which will copy the “older” BOOTSECT.EXE from the ADK folders to the deployment share when it detects that the date/time is different on the file).

A few comments on this setup:

  • You might ask why the USMT files are being copied into the USMTX folder.  Well, there are two parts to that:
  • MDT 2013 puts USMT 6.3 into the USMT 5 folder.  This is a carry-over from MDT 2012 Update 1.  While MDT was updated to pull the new USMT 6.3 from the ADK, it didn’t change where it put it.  Hence, it reused the USMT5 folder for USMT 6.3.
  • The ZTIUserState.wsf script uses the last character of the folder name (e.g. “5” from a folder named “USMT5” or “X” from a folder named “USMTX”) in various places.  Painfully obvious after I initially tried to use “USMT5.0” as the old version and things didn’t work right.  (I’d like to blame someone else for that logic, but it’s quite possible that I wrote it that way…)
  • You might also ask why you can’t just copy the BOOTSECT.EXE executable into the deployment share directly.  This is because MDT is smart enough to recopy the file from the ADK folder any time it changes in size or timestamp.  So if you don’t replace the version in the ADK folder, you’ll find the file gets overwritten with the newer one and breaks things again.
  • I’ve only tried this with Lite Touch deployments.  The ZTIUserState.wsf script is also used with MDT-created UDI task sequences in ConfigMgr 2012 R2, performing an offline USMT capture.  In that scenario, the script uses whatever USMT package was configured in the task sequence; it doesn’t select one dynamically based on the original OS.  So you would likely need to do some different work to get this to work.  See the ConfigMgr blog athttp://blogs.technet.com/b/configmgrteam/archive/2013/09/12/how-to-migrate-user-data-from-win-xp-to-win-8-1-with-system-center-2012-r2-configmgr.aspx for more information on the general approach needed there.  (You would have to consciously replace the ZTIUserState.wsf script in the MDT toolkit files package anyway to get it to use this new script.  The steps above will only affect the Lite Touch deployments from the deployment share that you update.)
  • The attached ZTIUserState.wsf will only work with MDT 2013 – I have no idea if it will work with previous versions of MDT, but then again previous versions don’t support Windows 8.1 anyway so there’s really no need to try.  I would also not suggest trying to use this script with any newer versions of MDT either.  (Fortunately Windows XP will be unsupported before a new version of MDT would be released anyway.)
  • If by chance you are using MDT on an x86 OS instead of an x64 OS, you’ll need to change the “Program Files (x86)” path to just “Program Files” in the above steps.

Remember, if you are still running Windows XP, you’re running out of time – April is right around the corner…

Ref: http://blogs.technet.com/b/mniehaus/archive/2014/01/09/migrating-from-windows-xp-to-windows-8-1-using-mdt-2013.aspx

ConfigMgr 2012 SP1 / R2 – Tips and Tricks

$
0
0

Tips and Tricks

Videos covering common ConfigMgr 2012 SP1 / R2 configurations and scenarios.


Troubleshooting CM2012 Task Sequence Actions Using ServiceUI (07:55)


ref: http://www.deploymentresearch.com/Videos/ConfigMgr2012SP1R2TipsandTricks.aspx

MDT 2010 Lite Touch Unleashed Videos

$
0
0

 Videos from the MDT 2010 Lite Touch – Unleashed series

Part 1 – Introduction to Windows AIK 2.0
  • Creating a custom WinPE image
  • Use ImageX to mount the image
  • Use DISM to inject a driver
  • Show BCDBoot
  • Use Windows System Image
    Manager (WSIM) to edit unattend.xml
Part 2 - Windows Deployment Services (WDS) configuration
  • PXE listener and Multicast
  • PXE Boot Policy
  • Network Configuration
Part 3 - Introduction to MDT 2010 Lite Touch
  • Create Deployment Share
  • Import Operating System
  • Add applications
  • Create Task Sequences
  • Create boot images
  • Test a deployment


Part 4 - Multiple Deployment Shares
  • Why we need them
  • Lab and Production shares
Part 5 - Creating the MDT Build Lab Share
  • Rules configuration
  • Configuring the task sequence
  • Using the LTI Suspend feature
Part 6 - Creating the MDT Production Share
    • Rules configuration
    • Configuring the task sequence
    • Joining the domain


Part 7 – Introduction to MDT 2010 Rules
    • Basic rules (customsettings.ini)
    • Using Properties
    • Review reference documentation
Part 8 - Integrating WDS with MDT 2010
  • Adding boot images from MDT to WDS
Part 9 - Using Multicast
    • Configuring MDT for Multicast
    • The WDS multicast namespace
    • Deploying Windows 7 using multicast


Part 10 – Troubleshooting MDT 2010 Lite
Touch
    • Debugging MDT
    • Solving network connection issues
    • Verifying storage controller drivers
    • Log files
Part 11 - Locating drivers for MDT
    • Third party vendor resources and
      utilities
    • Microsoft Catalog site for drivers
    • Locating PNPIDs
Part 12 - MDT 2010 Lite Touch Driver Management
    • Boot image drivers
    • Windows Operating system drivers
    • Out-of-box drivers repoistory in MDT 2010 Lite Touch
    • Using folders’
    • Using selection profiles to filter drivers
    • Using DriverGroups to filter drivers
      based on computer make and model


Part 13 – MDT 2010 Lite Touch Drivers Tips and Tricks
  • Configuring WinPE Scratchspace
  • Dealing with drivers that are
    applications and,or services
Part 14 – USMT 4.0 in action
  • USMT command lines
  • XML Templates
Part 15 - MDT 2010 Lite Touch – Refresh and Replace scenarios
  • Configuring Refresh and Replace in
    MDT 2010 Lite Touch
  • Starting a Refresh Deployment
  • Creating a Replace Task Sequence
  • Starting a Replace Deployment


Part 16 - Customizing USMT 4.0 migrations
  • Customizing profile capture using command line switches
  • Customizing data and settings using
    XML templates
  • Create customized templates
  • Configure rules in MDT 2010 Lite
    Touch for USMT 4.0
Part 17 – USMT 4.0 Troubleshooting
    • Reviewing log files
    • Configure USMT 4.0 Log files
Part 18 - Using the MDT 2010 database
    • Creating the MDT database
    • Add computer entries
    • Configuring roles in the database
    • Setting location based settings
    • Using Make and Model based settings


Part 19 - Extending the MDT 2010 Database
    • Create additional tables
    • Create additional stored procedures
    • Configure MDT to use stored
      procedures
Part 20 - Extending MDT 2010 with user
exits
    • Create User Exit scripts
    • Configure MDT 2010 to use user
      exits
Part 21 - Extending MDT 2010 with web services
    • Resources for web services in MDT 2010
    • Configure MDT 2010 to use web services
    • Tools for editing the MDT wizard


Part 22 - Speeding up development time in
MDT 2010
    • Tips and tricks for speeding up development time
    • Create a test environment
Part 23 - Scaling MDT 2010 Lite Touch in a distributed environment
    • Recommendations around Linked Deployment Shares
    • Configuring bootstrap.ini to connect
      to local deployment server
    • Replicating the deployment share
Part 24 - Troubleshooting – Following a Windows 7 Setup
    • The Windows 7 Setup Engine
    • Logfiles and troubleshooting
    • Debugging


Part 25 - Using Windows System Image Manager (WSIM)
    • Create unattend.xml files using WSIM
    • Understanding configuration passes
Part 26 - Component Based Servicing (CBS)
    • Resources for understanding CBS
    • Windows 7 Deployment resources
Part 27 - Windows 7 and Device Drivers
    • Understanding device drivers in Windows 7
    • The Windows 7 Driver Store
    • Using pnputil and DISM
    • Using Group Policies to control device drivers
    • How MDT integrates with the driver
      store
    • Driver signing and ranking


Ref: http://www.deploymentresearch.com/Videos/MDT2010LiteTouchUnleashedVideos.aspx

Sizing your ConfigMgr 2012 R2 Primary Site Server

$
0
0

Getting the right server configuration for your ConfigMgr 2012 R2 environment is far from an exact science, but with a few simply tests you can at least get an idea if you’re dead wrong, or still on track… As you probably know, ConfigMgr 2012 requires a lot more CPU and memory than ConfigMgr 2007 ever did, but the key bottleneck is most often Disk I/O.

Reaching out to the community

The information I have later in this post are from my own experience from various customer engagements the last few years, but I would love to hear from you. I’m hoping to gather additional real world numbers here, providing a few more samples that could help others sizing their ConfigMgr server better. If you are willing please contact me (via email) and we’ll take it from there.

The things I’m asking for is the following:

  • Notify help desk that ConfigMgr will be unavailable for 30 minutes.
  • Notify the storage folks that you plan to put some really high load on their SAN for about 15 minutes (ask nicely, and/or wait to off peak hours)
  • Create as large benchmarking large file (see note below) as you can on each volume.
  • Stop all ConfigMgr/SQL services on the site server (if possible disconnect the server from network).
  • Run SQLIO (use below PowerShell Script and pipe to a text file)
  • Send me the text file, and some info about your site server(s), VM configuration (CPU/Memory/disk), SAN Hardware etc.
Together we can provide some real world configurations that other admins can learn from…

Thanks / Johan

Update 2014-12-14: Added another real world sample config, see the Sample #2 section in the end of the article.

Single Primary Site Server, supporting 12.000 clients

For this scenario, I would start off with a single VM running Windows Server 2012 or Windows Server 2012 R2. Of course running SQL Server 2012 SP1 locally on the VM, and having the VM configured with 4 vCPU’s and 32 GB of RAM.

But before installing SQL Server 2012 SP1, I request a few disk volumes from the storage group to determine what the final disk layout will be. To determine the final disk layout I use SQLIO from Microsoft to get a rough idea about the performance I get from each volume. After gathering and reviewing the result from SQLIO I request the final disk layout from the storage group.
The critical thing about using SQLIO is to have enough amount of data to test with, a 100 GB file is enough for most tests, and to run the tests a least a few minutes. And please do not create the file using FSUtil, because it will just create an empty file, which the SAN cache may suck into RAM immediately and your test results will be off the charts. Create a “real” file, with content, generate a giant ISO file, or a large WinRAR archive, anything you can think of as long as the file is full with data.

You can also download the free CreateFile.exe written by Deepak Kumar (Adaptiva), which create test files that are uncompressible, again, so you can get real results.

Next step, benchmarking

Then run some SQLIO tests with various block sizes, here is a good starting point.

1
2
3
4
5
6
7
8
9
10
11
12
13
14
15
16
17
# Use CreateFile.exe to create the file
$BenchmarkFile='G:\Benchmarkfile.dat'
# Read Sequential, various blocksizes
.\SQLIO.EXE -s120 -kR -fsequential -b8 -t4 -o2 -LS -BN $BenchmarkFile
.\SQLIO.EXE -s120 -kR -fsequential -b64 -t4 -o2 -LS -BN $BenchmarkFile
.\SQLIO.EXE -s120 -kR -fsequential -b512 -t4 -o2 -LS -BN $BenchmarkFile
# Read Random, various blocksizes
.\SQLIO.EXE -s120 -kR -frandom -b8 -t4 -o16 -LS -BN $BenchmarkFile
.\SQLIO.EXE -s120 -kR -frandom -b64 -t4 -o16 -LS -BN $BenchmarkFile
.\SQLIO.EXE -s120 -kR -frandom -b512 -t4 -o16 -LS -BN $BenchmarkFile
# Write Random, various blocksizes
.\SQLIO.EXE -s120 -kW -frandom -b8 -t4 -o16 -LS -BN $BenchmarkFile
.\SQLIO.EXE -s120 -kW -frandom -b64 -t4 -o16 -LS -BN $BenchmarkFile
.\SQLIO.EXE -s120 -kW -frandom -b512 -t4 -o2 -LS -BN $BenchmarkFile

For example, if you get the below results I would expect a somewhat normal SAN (or just a badly configured/sized high-end SAN), and would recommend a classic ConfigMgr disk layout with six volumes.

  • Read Sequential -  with 8 kb blocks: 5000 – 25000 IOPS
  • Random write – with 8 kb blocks: 2000 – 7000 IOPS

In this configuration I’m splitting the DB files, the DB Logs, and the TempDB over three different volumes.

Classic ConfigMgr 2012 Disk Layout
Low-end SAN configuration.

However, if I’m starting to see values way over 50000 IOPS for the same read, and 20000 IOPS for the same write, I would expect a really high-end SAN, or possible a local SSD array, or a local accelerator card (FusionIO etc.) and would most likely recommend a different disk layout with only four volumes. Because of the large amount of IO, dividing the database components is not as critical as for the previous scenario.

High Speed Disk - ConfigMgr 2012
SSD or SSD Accelerator card configuration.


Sample #2 – 3000 clients

Some time ago I got a configuration sent from a smaller environment.

They had 8 x 600 GB SSD, one big RAID10 array, split up into logical volumes for OS/APP/Content/Database. Even though there are other options with available with that many SSD disks, this will work great for a small site. Here are the SQLIO results from one of the volumes:

  • Read Sequential -  with 8 kb blocks: 28000 IOPS, 200 MBs/Sec
  • Read Sequential -  with 64 kb blocks: 15000 IOPS, 965 MBs/Sec
  • Random write – with 8 kb blocks: 72000 IOPS, 565 MBs/Sec
  • Random write – with 64 kb blocks: 22500 IOPS, 1400 MBs/Sec

Note: These are the live results when running the tests once, buffering set to not use file nor disk caches. The first result seemed quite low, so I think it was a onetime glitch in that test. The other results are a better match for the disk configuration:


ref: http://www.deploymentresearch.com/Research/tabid/62/EntryId/115/Sizing-your-ConfigMgr-2012-R2-Primary-Site-Server.aspx

Interview Questions on VMware ESXi with Answers

$
0
0
1. What is a Hypervisor?
It is a program that allows multiple operating systems to share a single hardware host. Each operating system appears to have the host’s processor, memory, and other resources all to itself. However, the hypervisor is actually controlling the host processor and resources, allocating what is needed to each operating system in turn and making sure that the guest operating systems (called virtual machines) cannot disrupt each other.
2. What is the hardware version used in VMware ESXi 5.5?
Version 10
Below is the table showing the different version of hardware used in different VMware products along with their release version
Virtual Hardware Version
Products
10
ESXi 5.5, Fusion 6.x, Workstation 10.x, Player 6.x
9
ESXi 5.1, Fusion 5.x, Workstation 9.x, Player 5.x
8
ESXi 5.0, Fusion 4.x, Workstation 8.x, Player 4.x
7
ESXi/ESX 4.x, Fusion 2.x/3.x Workstation 6.5.x/7.x,Player 3.x
6
Workstation 6.0.x
4
ACE 2.x, ESX 3.x, Fusion 1.x, Player 2.x
3 and 4
ACE 1.x, Player 1.x, Server 1.x, Workstation 5.x, Workstation 4.x
3
ESX 2.x, GSX Server 3.x
3. What is the difference between the vSphere ESX and ESXi architectures?
VMware ESX and ESXi are both bare metal hypervisor architectures that install directly on the server hardware.
Although neither hypervisor architectures relies on an OS for resource management, the vSphere ESX architecture relied on a Linux operating system, called the Console OS (COS) or service console, to perform two management functions: executing scripts and installing third-party agents for hardware monitoring, backup or systems management.
In the vSphere ESXi architecture, the service console has been removed. The smaller code base of vSphere ESXi represents a smaller “attack surface” and less code to patch, improving reliability and security.
4. What is a .vmdk file?
This isn’t the file containing the raw data. Instead it is the disk descriptor file which describes the size and geometry of the virtual disk file. This file is in text format and contains the name of the –flat.vmdk file for which it is associated with and also the hard drive adapter type, drive sectors, heads and cylinders, etc. One of these files will exist for each virtual hard drive that is assigned to your virtual machine. You can tell which –flat.vmdk file it is associated with by opening the file and looking at the Extent Description field.
Follow the below link for more details
5. What are the different types of virtualization?
Server Virtualization – consolidating multiple physical servers into virtual servers that run on a single physical server.
Application Virtualization – an application runs on another host from where it is installed in a variety of ways. It could be done by application streaming, desktop virtualization or VDI, or a VM package (like VMware ACE creates with a player). Microsoft Softgrid is an example of Application virtualization.
Presentation Virtualization – This is what Citrix Met frame (and the ICA protocol) as well as Microsoft Terminal Services (and RDP) are able to create. With presentation virtualization, an application actually runs on another host and all that you see on the client is the screen from where it is run.
Network Virtualization – with network virtualization, the network is “carved up” and can be used for multiple purposes such as running a protocol analyzer inside an Ethernet switch. Components of a virtual network could include NICs, switches, VLANs, network storage devices, virtual network containers, and network media.
Storage Virtualization – with storage virtualization, the disk/data storage for your data is consolidated to and managed by a virtual storage system. The servers connected to the storage system aren’t aware of where the data really is. Storage virtualization is sometimes described as “abstracting the logical storage from the physical storage.
6. What is VMware vMotion and what are its requirements?
VMware VMotion enables the live migration of running virtual machines from one physical server to another with zero downtime.
VMotion lets you:
  • Automatically optimize and allocate entire pools of resources for maximum hardware utilization and
  • availability.
  • Perform hardware maintenance without any scheduled downtime.
  • Proactively migrate virtual machines away from failing or under performing servers.
Below are the pre-requisites for configuring vMotion
  • Each host must be correctly licensed for vMotion
  • Each host must meet shared storage requirements
    • vMotion migrates the vm from one host to another which is only possible with both the host are sharing a common storage or to any storage accessible by both the source and target hosts.
    • A shared storage can be on a Fibre Channel storage area network (SAN), or can be implemented using iSCSI SAN and NAS.
    • If you use vMotion to migrate virtual machines with raw device mapping (RDM) files, make sure to maintain consistent LUN IDs for RDMs across all participating hosts.
  • Each host must meet the networking requirements
    • Configure a VMkernel port on each host.
    • Dedicate at least one GigE adapter for vMotion.
    • Use at least one 10 GigE adapter if you migrate workloads that have many memory operations.
    • Use jumbo frames for best vMotion performance.
    • Ensure that jumbo frames are enabled on all network devices that are on the vMotion path including physical NICs, physical switches and virtual switches.
7. What is the difference between clone and template in VMware?
Clone
  • A clone is a copy of virtual machine.
  • You cannot convert back the cloned Virtual Machine.
  • A Clone of a Virtual Machine can be created when the Virtual Machine is powered on
  • Cloning can be done in two ways namely Full Clone and Linked Clone.
  • A full clone is an independent copy of a virtual machine that shares nothing with the parent virtual machine after the cloning operation. Ongoing operation of a full clone is entirely separate from the parent virtual machine.
  • A linked clone is a copy of a virtual machine that shares virtual disks with the parent virtual machine in an ongoing manner. This conserves disk space, and allows multiple virtual machines to use the same software installation.
  • Cloning a virtual machine can save time if you are deploying many similar virtual machines. You can create, configure, and install software on a single virtual machine, and then clone it multiple times, rather than creating and configuring each virtual machine individually.
Template
  • A template is a master copy or a baseline image of a virtual machine that can be used to create many clones.
  • Templates cannot be powered on or edited, and are more difficult to alter than ordinary virtual machine.
  • You can convert the template back to Virtual Machine to update the base template with the latest released patches and updates and to install or upgrade any software and again convert back to template to be used for future deployment of Virtual Machines with the latest patches.
  • Convert virtual Machine to template cannot be performed, when Virtual machine is powered on.  Only Clone to Template can be performed when the Virtual Machine is powered on.
  • A template offers a more secure way of preserving a virtual machine configuration that you want to deploy many times.
  • When you clone a virtual machine or deploy a virtual machine from a template, the resulting cloned virtual machine is independent of the original virtual machine or template.
8. What is promiscuous mode in Vmware?
  • Promiscuous mode is a security policy which can be defined at the virtual switch or portgroup level
  • A virtual machine, Service Console or VMkernel network interface in a portgroup which allows use of promiscuous mode can see all network traffic traversing the virtual switch.
  • If this mode is set to reject, the packets are sent to intended port so that the intended virtual machine will only be able to see the communication.
  • Example: In case you are using a virtual xp inside any Windows VM. If promiscuous mode is set to reject then the virtual xp won’t be able to connect the network unless promiscuous mode is enabled for the Windows VM.
9. What is the difference between Thick provision Lazy Zeroed, Thick provision Eager Zeroed and Thin provision?
Thick Provision Lazy Zeroed
  • Creates a virtual disk in a default thick format.
  • Space required for the virtual disk is allocated when the virtual disk is created.
  • Data remaining on the physical device is not erased during creation, but is zeroed out on demand at a later time on first write from the virtual machine.
  • Using the default flat virtual disk format does not zero out or eliminate the possibility of recovering deleted files or restoring old data that might be present on this allocated space.
  • You cannot convert a flat disk to a thin disk.
Thick Provision Eager Zeroed
  • A type of thick virtual disk that supports clustering features such as Fault Tolerance.
  • Space required for the virtual disk is allocated at creation time.
  • In contrast to the flat format, the data remaining on the physical device is zeroed out when the virtual disk is created.
  • It might take much longer to create disks in this format than to create other types of disks.
Thin Provision
  • It provides on on-demand allocation of blocks of data.
  • All the space allocated at the time of creation of virtual disk is not utilized on the hard disk, rather only the size with utilized data is locked and the size increases as the amount of data is increased on the disk.
  • With thin provisioning, storage capacity utilization efficiency can be automatically driven up towards 100% with very little administrative overhead.
10. What is a snapshot?
A snapshot is a “point in time image” of a virtual guest operating system (VM). That snapshot contains an image of the VMs disk, RAM, and devices at the time the snapshot was taken. With the snapshot, you can return the VM to that point in time, whenever you choose. You can take snapshots of your VMs, no matter what guest OS you have and the snapshot functionality can be used for features like performing image level backups of the VMs without ever shutting them down.
11. What is VDI?
  • VDI stands for Virtual Desktop Infrastructure where end user physical machine like desktop or laptop are virtualized due to which VMware described VDI as “delivering desktops from the data center”.
  • Once VDI is used the end user connect to their desktop using a device called thin client.
  • The end user can also connect to their desktop using VMware Horizon View installed on any desktop or mobile devices
12. What is VMware HA?
  • VMware HA i.e. High Availability which works on the host level and is configured on the Cluster.
  • A Cluster configured with HA will migrate and restart all the vms running under any of the host in case of any host-level failure automatically to another host under the same cluster.
  • VMware HA continuously monitors all ESX Server hosts in a cluster and detects failures.
  • VMware HA agent placed on each host maintains a heartbeat with the other hosts in the cluster using the service console network. Each server sends heartbeats to the others servers in the cluster at five-second intervals. If any servers lose heartbeat over three consecutive heartbeat intervals, VMware HA initiates the failover action of restarting all affected virtual machines on other hosts.
  • You can set virtual machine restart priority in case of any host failure depending upon the critical nature of the vm.
NOTE: Using HA in case of any host failure with RESTART the vms on different host so the vms state will be interrupted and it is not a live migration
13. What is the difference between VMware HA and vMotion?
VMware HA is used in the event when any of the hosts inside a cluster fails then all the virtual machines running under it are restarted on different host in the same cluster.
Now HA is completely dependent on vMotion to migrate the vms to different host so vMotion is just used for the migration purpose between multiple hosts. vMotion also has the capability to migrate any vm without interrupting its state to any of the host inside cluster.
14. What is storage vMotion?
  • Storage vMotion is similar to vMotion in the sense that “something” related to the VM is moved and there is no downtime to the VM guest and end users. However, with SVMotion the VM Guest stays on the server that it resides on but the virtual disk for that VM is what moves.
  • With Storage vMotion, you can migrate a virtual machine and its disk files from one datastore to another while the virtual machine is running.
  • You can choose to place the virtual machine and all its disks in a single location, or select separate locations for the virtual machine configuration file and each virtual disk.
  • During a migration with Storage vMotion, you can transform virtual disks from Thick-Provisioned Lazy Zeroed or Thick-Provisioned Eager Zeroed to Thin-Provisioned or the reverse.
  • Perform live migration of virtual machine disk files across any Fibre Channel, iSCSI, FCoE and NFS storage
15. What is VMware DRS and how does it works?
  • Here DRS stands for Distributed Resource Scheduler which dynamically balances resource across various host under Cluster or resource pool.
  • VMware DRS allows users to define the rules and policies that decide how virtual machines share resources and how these resources are prioritized among multiple virtual machines.
  • Resources are allocated to the virtual machine by either migrating it to another server with more available resources or by making more “space” for it on the same server by migrating other virtual machines to different servers.
  • The live migration of virtual machines to different physical servers is executed completely transparent to end-users through VMware VMotion
  • VMware DRS can be configured to operate in either automatic or manual mode. In automatic mode, VMware DRS determines the best possible distribution of virtual machines among different physical servers and automatically migrates virtual machines to the most appropriate physical servers. In manual mode, VMware DRS provides a recommendation for optimal placement of virtual machines, and leaves it to the system administrator to decide whether to make the change.
16. What is VMware Fault Tolerance?
  • VMware Fault Tolerance provides continuous availability to applications running in a virtual machine, preventing downtime and data loss in the event of server failures.
  • VMware Fault Tolerance, when enabled for a virtual machine, creates a live shadow instance of the primary, running on another physical server.
  • The two instances are kept in virtual lockstep with each other using VMware vLockstep technology
  • The two virtual machines play the exact same set of events, because they get the exact same set of inputs at any given time.
  • The two virtual machines constantly heartbeat against each other and if either virtual machine instance loses the heartbeat, the other takes over immediately. The heartbeats are very frequent, with millisecond intervals, making the failover instantaneous with no loss of data or state.
  • VMware Fault Tolerance requires a dedicated network connection, separate from the VMware VMotion network, between the two physical servers.
17. In a cluster with more than 3 hosts, can you tell Fault Tolerance where to put the Fault Tolerance virtual machine or does it chose on its own?
You can place the original (or Primary virtual machine). You have full control with DRS or vMotion to assign it to any node. The placement of the Secondary, when created, is automatic based on the available hosts. But when the Secondary is created and placed, you can vMotion it to the preferred host.
18. How many virtual CPUs can I use on a Fault Tolerant virtual machine ?
vCenter Server 4.x and vCenter Server 5.x support 1 virtual CPU per protected virtual machine.
19. What happens if vCenter Server is offline when a failover event occurs?
When Fault Tolerance is configured for a virtual machine, vCenter Server need not be online for FT to work. Even if vCenter Server is offline, failover still occurs from the Primary to the Secondary virtual machine. Additionally, the spawning of a new Secondary virtual machine also occurs without vCenter Server.
20. What is the difference between Type 1 and Type 2 Hypervisor?
Type 1 Hypervisor
  • This is also known as Bare Metal or Embedded or Native Hypervisor.
  • It works directly on the hardware of the host and can monitor operating systems that run above the hypervisor.
  • It is completely independent from the Operating System.
  • The hypervisor is small as its main task is sharing and managing hardware resources between different operating systems.
  • A major advantage is that any problems in one virtual machine or guest operating system do not affect the other guest operating systems running on the hypervisor.
  • Examples: VMware ESXi Server, Microsoft Hyper-V, Citrix/Xen Server
Type 2 Hypervisor
  • This is also known as Hosted Hypervisor.
  • In this case, the hypervisor is installed on an operating system and then supports other operating systems above it.
  • It is completely dependent on host Operating System for its operations
  • While having a base operating system allows better specification of policies, any problems in the base operating system a ffects the entire system as well even if the hypervisor running above the base OS is secure.
  • Examples: VMware Workstation, Microsoft Virtual PC, Oracle Virtual Box
21. How does vSphere HA works?
When we configure multiple hosts for HA cluster, a single host is automatically elected as the master host. The master host communicates with vCenter Server and monitors the state of all protected virtual machines and of the slave hosts. When you add a host to a vSphere HA cluster, an agent is uploaded to the host and configured to communicate with other agents in the cluster.22. What are the monitoring methods used for vSphere HA?
The Master and Slave hosts uses two types of monitoring the status of the hosts
  • Datastore Heartbeat
  • Network Heartbeat

23. What are the roles of master host in vSphere HA?

  • Monitoring the state of slave hosts. If a slave host fails or becomes unreachable, the master host identifies which virtual machines need to be restarted.
  • Monitoring the power state of all protected virtual machines. If one virtual machine fails, the master host ensures that it is restarted. Using a local placement engine, the master host also determines where the restart should be done.
  • Managing the lists of cluster hosts and protected virtual machines.
  • Acting as vCenter Server management interface to the cluster and reporting the cluster health state.

24. How is a Master host elected in vSphere HA environment?
When vSphere HA is enabled for a cluster, all active hosts (those not in standby or maintenance mode, or not disconnected) participate in an election to choose the cluster’s master host. The host that mounts the greatest number of datastores has an advantage in the election. Only one master host typically exists per cluster and all other hosts are slave hosts.

If the master host fails, is shut down or put in standby mode, or is removed from the cluster a new election is held.

25. If the vCenterserver goes down with a situation that it was pre configured with vSphere HA and DRS, so after power down will HA and DRS perform their task?
vSphere HA is not dependent on vCenterserver for its operations as when HA is configured it installs an agent into each host which does its part and is not dependent on vCenterserver. Also HA doesnot uses vMotion, it justs restarts the vms into another host in any case of host failure.

Further vSphere DRS is very much dependent on vCenterserver as it uses vMotion for its action for live migration of vms between multiple hosts so in case vCenterserver goes down the vMotion won’t work leading to failure of DRS.

26. What is the use of vmware tools?
VMware Tools is a suite of utilities that enhances the performance of the virtual machine’s guest operating system and improves management of the virtual machine. Without VMware Tools installed in your guest operating system, guest performance lacks important functionality. Installing VMware Tools eliminates or improves these issues:

  • Low video resolution
  • Inadequate color depth
  • Incorrect display of network speed
  • Restricted movement of the mouse
  • Inability to copy and paste and drag-and-drop files
  • Missing sound
  • Provides the ability to take quiesced snapshots of the guest OS
  • Synchronizes the time in the guest operating system with the time on the host
  • Provides support for guest-bound calls created with the VMware VIX API

Another Resource

1. VMWare Kernel is a Proprietary Kenral and is not based on any of the UNIX operating systems, it’s a kernel developed by VMWare Company.
2. The VMKernel can’t boot it by itself, so that it takes the help of the 3rd party operating system. In VMWare case the kernel is booted by RedHat Linux operating system which is known as service console.
3. The service console is developed based up on Redhat Linux Operating system, it is used to manage the VMKernel
4. To restart webaccess service on vmware
service vmware-webaccess restart – this will restart apache tomcat app
5. To restart ssh service on vmware
service sshd restart
6. To restart host agent(vmware-hostd) on vmware esx server
service mgmt-vmware restart
7. Path for the struts-config.xml
/usr/lib/vmware/webAccess/tomcat/apache-tomcat-5.5.17/webapps/ui/WEB-INF/
8. To start the scripted install the command is
    esx ks=nfs:111.222.333.444:/data/KS.config ksdevice=eth0
location                                             device name
9. Virtual Network in Simple……………….
Virtual Nic(s) on Virtual Machine(s) —–>
Physical Nic on the ESX Server (Virtual Switch – 56 Ports)  —–>
Physical Switch Port Should be trunked with all the VLANS to which the VM’s need access
All the ESX servers should be configured with Same number of Physical Nics (vSwitches) and Connectivity also should be same, So that vMotion succeeds
All the Virtual Machines are connected to one vSwitch with Different VLANS, this means the Physical Nic(vSwitch) needs to be trunked with the same VLANS on the Physical Switch Port


10 What are the three port groups present in ESX server networking
   1. Virtual Machine Port Group – Used for Virtual Machine Network
2. Service Console Port Group – Used for Service Console Communications
3. VMKernel Port Group – Used for VMotion, iSCSI, NFS Communications
11. What is the use of a Port Group?
The port group segregates the type of communication.
12. What are the type of communications which requires an IP address for sure ?
   Service Console and VMKernel (VMotion and iSCSI), these communications does not happen without an ip address (Whether it is a single or dedicated)
13. In the ESX Server licensing features VMotion License is showing as Not used, why?
    Even though the license box is selected, it shows as “License Not Used” until, you enable the VMotion option for specific vSwitch
 14. How the Virtual Machineort group communication works ? 
     All the vm’s which are configured in VM Port Group are able to connect to the physical machines on the network. So this port group enables communication between vSwitch and Physical Switch to connect vm’s to Physical Machine’s
15. What is a VLAN ?
     A VLAN is a logical configuration on the switch port to segment the IP Traffic. For this to happen, the port must be trunked with the correct VLAN ID.
16. Does the vSwitches support VLAN Tagging? Why? 
     Yes, The vSwitches support VLAN Tagging, otherwise if the virtual machines in an esx host are connected to different VLANS, we need to install a separate physical nic (vSwitch) for every VLAN. That is the reason vmware included the VLANtagging for vSwitches. So every vSwitch supports upto 1016 ports, and BTW they can support 1016 VLANS if needed, but an ESX server doesn’t support that many VM’s. :)
17. What is Promiscuous Mode on vSwitch ? What happens if it sets to Accept?
     If the promiscuous mode set to Accept, all the communication is visible to all the virtual machines, in other words all the packets are sent to all the ports on vSwitch
If the promiscuous mode set to Reject, the packets are sent to inteded port, so that the intended virtual machine was able to see the communication.
18. What is MAC address Changes ? What happens if it is set to Accept ?
When we create a virtual machine the configuration wizard generates a MAC address for that machine, you can see it in the .vmx (VM Config) file. If it doesn’t matches with the MAC address in the OS this setting does not allow incoming traffic to the VM. So by setting Reject Option both MAC addresses will be remains same, and the incoming traffic will be allowed to the VM.
19. What is Forged Transmits ? What happens if it is set to Accept ?
When we create a virtual machine the configuration wizard generates a MAC address for that machine, you can see it in the .vmx (VM Config) file. If it doesn’t matches with the MAC address in the OS this setting does not allow outgoing traffic from the VM. So by setting Reject Option both MAC addresses will be remains same, and the outgoing traffic will be allowed from the VM.
20. What are the core services of VC ?
VM provisioning , Task Scheduling and Event Logging
21. Can we do vMotion between two datacenters ? If possible how it will be?
Yes we can do vMotion between two datacenters, but the mandatory requirement is the VM should be powered off.
22. What is VC agent? and what service it is corresponded to? What are the minimum req’s for VC agent installation ?
VC agent is an agent installed on ESX server which enables communication between VC and ESX server.
The daemon  associated with it is called vmware-hostd , and the service which corresponds to it is called as mgmt-vmware, in the event of VC agent failure just restart the service by typing the following command at the service console
     ” service mgmt-vmware restart “ 
VC agent installed on the ESX server when we add it to the VC, so at the time of installtion if you are getting an error like ” VC Agent service failed to install “, check the /Opt size whether it is sufficient or not.
23. How can you edit VI Client Settings and VC Server Settings ?
Click Edit Menu on VC and Select Client Settings to change VI settings
Click Administration Menu on VC and Select VC Management Server Configuration to Change VC Settings
24. What are the files that make a Virtual Machine  ?
     .vmx – Virtual Machine Configuration File
.nvram – Virtual Machine BIOS
.vmdk – Virtual Machine Disk file
.vswp – Virtual Machine Swap File
.vmsd – Virtual MAchine Snapshot Database
.vmsn – Virtual Machine Snapshot file
.vmss – Virtual Machine Suspended State file
.vmware.log – Current Log File
.vmware-#.log – Old Log file
25. What are the devices that can be added while the virtual Machine running
In VI 3.5 we can add Hard Disk and NIC’s while the machine running.
In vSphere 4.0 we can add Memory and Processor along with HDD and NIC’s while the machine running
26. How to set the time delay for BIOS screen for a Virtual Machine?
Right Click on VM, select edit settings, choose options tab and select boot option, set the delay how much you want.
27. What is a template ?
We can convert a VM into Template, and it cannot be powered on once its changed to template. This is used to quick provisioning of VM’s.
23. What to do to customize the windows virtual machine clone,?
copy the sysprep files to Virtual center directory on the server, so that the wizard will take the advantage of it.
24. What to do to customize the linux/unix virtual machine clone,?
VC itself includes the customization tools, as these operating systems are available as open source.
25. Does cloning from template happens between two datacenters ?
Yes.. it can, if the template in one datacenter, we can deploy the vm from that template in another datacenter without any problem.
26. What are the common issues with snapshots? What stops from taking a snapshot and how to fix it ?
If you configure the VM with Mapped LUN’s, then the snapshot failed. If it is mapped as virtual then we can take a snapshot of it.
If you configure the VM with Mapped LUN’s as physical, you need to remove it to take a snapshot.
27. What are the settings that are taken into to consideration when we initiate a snapshot ?
Virtual Machine Configuration (What hardware is attached to it)
State of the Virtual Machine Hard Disk file ( To revert back if needed)
State of the Virtual Machine Memory (if it is powered on)
28. What are the requirements for Converting a Physical machine to VM ?
An agent needs to be installed on the Physical machine
VI client needs to be installed with Converter Plug-in
A server to import/export virtual machines
29. What is VMWare consolidated backup ?
It is a backup framework, that supports 3rd party utilities to take backups of ESX servers and Virtual Machines. Its not a backup service.
30. To open the guided consolidation tool, what are the user requirements ?
The user must be member of administrator, The user should have “Logon as service” privileges – To give a user these privileges,open local sec policy, select Logon as service policy and add the user the user should have read access to AD to send queries

ref: http://www.01world.in/p/vmware-admin-interview-questions.html

ref: http://www.golinuxhub.com/2014/07/interview-questions-on-vmware-esxi-with.html


Assigning a Load Evaluator to a Server in Citrix Xenapp 6.5

$
0
0
    1. Expand the Servers node in the XenApp Center.
    2. Right-click XENAPPSERVERand select Other tasks > Assign load evaluator.

    1. Select [Test] Max 1 Instance Per Server from the Load Evaluator drop-down menuand click OK.

Creating a Failover Situation in Citrix Xenapp 6.5

$
0
0
    1. Use the Citrix Delivery Services Console to create a new Load Balancing policy called ABC Failover to XYZ.
    2. Right-click the Load Balancing Policies node and select Create load balancing policy

    1. Type ABC to XYZ in the Name field.

    1. Create a filter for the ABC Employees group.<.li>
    2. Navigate to Filters > Users then select Filter based on user.

    1. Click Add and click OK in the warning dialog.
    2. Type Domain \ABC Employees in the Enter object names to select field, click Check Name and then click OK, if the name is validated successfully.
    3. Configure the application connection preference based on worker group by adding the ABC worker group only.
    4. Click on the Worker Group Preference node.

    1. Select Configure application connection preference based on worker group and click Add.
    2. Double click ABC and click OK in the Select Servers window.

    1. Click OK to finish and save the new load balancing property.


Testing a No Service situation without Failover in Citrix Xenapp 6.5

$
0
0
    1. Log out of the Citrix online Plug-in on the Win 7 machine and log back on as the citrix user account. Launch the WinWord application.
    2. Use the Citrix online plug-in to log on as the domain\citrix user
      1. Click the Citrix online Plug-in icon and click Notepad to launch the application
    3. Log on to the XenAppServer machine as the CitrixAdmin user, log on to the Web Interface using the CitrixAdmin account through Internet Explorer and launch the Notepad application
    4. Switch to the win 7 virtual machine
    5. Log on to the win 7 virtual machine as the CitrixAdmin user
    6. Click Start > Internet Explorer and navigate to the Web Interface site athttp://xenappservername/citrix/xenapp.
    7. Log on to the Web Interface as the CitrixAdmin user.
    8. Launch the Notepad application.

An error appears. The load evaluator that was created and applied to XenAppServer is reporting a full load and is no longer accepting connections.

  1. Log off of the Web Interface and close Internet Explorer.

Handling Failover with a Load Balancing Policy in Citrix Xenapp 6.5

$
0
0
    1. Use the Delivery Services Console to edit the ABC Failover to XYZ load balancing policy.
    2. Click the Load Balancing Policies node in the Delivery Services console.
    3. Right-click ABC to XYZ and select Modify properties.
    4. Add the XYZ worker group to the Load Balancing Failover Group.
    5. Navigate to Load Balancing Policies > Worker Group Preference and click Add.
    6. Double click XYZ and click OK.
  1. Confirm that the XYZ worker group priority is set to 2 and then click OK.

Configuring Printing in Citrix Xenapp 6.5

$
0
0

Identifying Printer Defaults

      Use the following procedure to verify the default printer driver creation behavior:


  1. Launch the Notepad application through Citrix Dazzle on the EndUserSimulatorvirtualmachine.
    1. Click Start > All Programs > Dazzle Apps > Notepad.
    2. After a moment, the Notepad application will launch through XenApp

    3. Select Do not ask me again for this site and click Yes on the USB/Other devices securitywarning, if it appears.
  2. Use the Print dialog to verify what each auto-created printer is using as its default printerdriver.
    1. Click File > Print in Notepad.
    2. Right-click HP Color LaserJet 9500 PCL 6 (from ENDUSER) and click Properties.
    3. Make note of the printer driver listed in the Model field.

    4. Repeat the previous step to check the default printer drivers for the HP Color LaserJet4600 PCL 6, HP Color and LaserJet CP2020 Series PCL 6.
    5. Verify that all of the listed printers are using their native print drivers except for the

HP Color LaserJet 4600 PCL 6

       that is using the Citrix Universal Print Driver.
  1. Close Notepad and log off of the EndUserSimulator virtual machine.
    1. Click File > Exit to close the Notepad application.
    2. Click Start and then click the Arrow near Shut down. Click Log off to log off of the EndUserSimulator virtual machine.

Identifying Printer Defaults in Citrix Xenapp 6.5

$
0
0

Identifying Printer Defaults

      Use the following procedure to verify the default printer driver creation behavior:


  1. Launch the Notepad application through Citrix Dazzle on the EndUserSimulatorvirtualmachine.
    1. Click Start > All Programs > Dazzle Apps > Notepad.
    2. After a moment, the Notepad application will launch through XenApp

    3. Select Do not ask me again for this site and click Yes on the USB/Other devices securitywarning, if it appears.
  2. Use the Print dialog to verify what each auto-created printer is using as its default printerdriver.
    1. Click File > Print in Notepad.
    2. Right-click HP Color LaserJet 9500 PCL 6 (from ENDUSER) and click Properties.
    3. Make note of the printer driver listed in the Model field.

    4. Repeat the previous step to check the default printer drivers for the HP Color LaserJet4600 PCL 6, HP Color and LaserJet CP2020 Series PCL 6.
    5. Verify that all of the listed printers are using their native print drivers except for the

HP Color LaserJet 4600 PCL 6

       that is using the Citrix Universal Print Driver.
  1. Close Notepad and log off of the EndUserSimulator virtual machine.
    1. Click File > Exit to close the Notepad application.
    2. Click Start and then click the Arrow near Shut down. Click Log off to log off of the EndUserSimulator virtual machine.

Managing Driver Compatibility Lists in Citrix Xenapp 6.5

$
0
0

Managing Driver Compatibility Lists

      Use the

XenAppServer-1

       virtual machine logged in as the

Coolidge\CitrixAdminuser

       for this task.


      Use the following procedure to manage driver compatibility lists:


  1. Use the Group Policy Management Tool on the XenAppServer-1 virtual machine to modify the XenApp Domain Policy. Access the Citrix User Policies node.
    1. Click Start > Administrative Tools > Group Policy Management to launch the Group Policy Management Tool.
    2. Navigate to Forest: coolidge.net > Domains > coolidge.net, right-click XenApp Domain Policy and select Edit.
    3. Navigate to User Configuration > Policies > Citrix Policies.
  2. Create a new policy called Do Not Allow HP 4600 that restricts driver mapping for the HP Color LaserJet 4600 Series PCL6 printer. Once created, continue to the filters screen.
    1. Click New, type Do Not Allow HP 4600 and click Next to continue to the settings screen.
    2. Select ICA > Printing > Drivers, click Printer driver mapping and compatibility and click Add.
    3. In the Add Setting window, click Add, type HP Color LaserJet 4600 PCL6 in the Driver Name field and selectDo not create.
    4. Click OK in the Add driver mapping and Add Setting windows.
  3. Create a filter that applies this policy to all domain users.
    1. Click Next to continue to the filters screen.
    2. Select User, click Add and then click Add in the New Filter window.
    3. Verify that Allow is selected in the Mode drop-down menu and type Coolidge\Domain Users in the User name field.
    4. Click OK to save the new filter element.
  4. Finish adding filters, enable the policy and then save it.
    1. Click OK to close the New Filter screen.
    2. Click Next to finish adding filters.
    3. Verify that Enable this policy is selected and then click Save.
Viewing all 76 articles
Browse latest View live